Difference between revisions of "Dynamic Load Balancing"
| (2 intermediate revisions by the same user not shown) | |||
| Line 20: | Line 20: | ||
! style="background-color: #0054A6; color:#FFFFFF; padding: 8px;" | Technical information | ! style="background-color: #0054A6; color:#FFFFFF; padding: 8px;" | Technical information | ||
! style="background-color: #0054A6; color:#FFFFFF; padding: 8px;" | Configuration in mobile application | ! style="background-color: #0054A6; color:#FFFFFF; padding: 8px;" | Configuration in mobile application | ||
| − | |||
|- | |- | ||
| Line 26: | Line 25: | ||
| style="padding: 2px;" | [[EM and ET models]] <br> | | style="padding: 2px;" | [[EM and ET models]] <br> | ||
| style="padding: 2px;" | [[Carlo Gavazzi settings]] | | style="padding: 2px;" | [[Carlo Gavazzi settings]] | ||
| − | |||
|- | |- | ||
| Line 32: | Line 30: | ||
| style="padding: 2px;" | [[PAC models]] <br> | | style="padding: 2px;" | [[PAC models]] <br> | ||
| style="padding: 2px;" | [[Siemens settings]] | | style="padding: 2px;" | [[Siemens settings]] | ||
| − | |||
|- | |- | ||
| Line 38: | Line 35: | ||
| style="padding: 2px;" | [[A and B models]] <br> | | style="padding: 2px;" | [[A and B models]] <br> | ||
| style="padding: 2px;" | [[ABB settings]] | | style="padding: 2px;" | [[ABB settings]] | ||
| − | |||
|- | |- | ||
| style="padding: 2px;" | Eastron SDMxx <br> | | style="padding: 2px;" | Eastron SDMxx <br> | ||
| − | | style="padding: 2px;" | [[ | + | | style="padding: 2px;" | [[SMD models]] <br> |
| style="padding: 2px;" | [[Eastron settings]] | | style="padding: 2px;" | [[Eastron settings]] | ||
| − | |||
|- | |- | ||
| Line 50: | Line 45: | ||
| style="padding: 2px;" | [[PRO model]] | | style="padding: 2px;" | [[PRO model]] | ||
| style="padding: 2px;" | [[Inepro settings]] | | style="padding: 2px;" | [[Inepro settings]] | ||
| − | |||
|- | |- | ||
| − | |||
| − | |||
| − | |||
| − | |||
| − | |||
| − | |||
| − | |||
| − | |||
| − | |||
| − | |||
| − | |||
| − | |||
| − | |||
| − | |||
| − | |||
| − | |||
| − | |||
| − | |||
| − | |||
| style="padding: 8px;" colspan="4" | ''More coming soon...'' | | style="padding: 8px;" colspan="4" | ''More coming soon...'' | ||
| − | |||
| − | |||
| − | |||
|} | |} | ||
| − | |||
| − | |||
Revision as of 21:32, 30 March 2023
Main Page > TeltoCharge > Advanced Topics > Dynamic Load BalancingDYNAMIC LOAD BALANCING
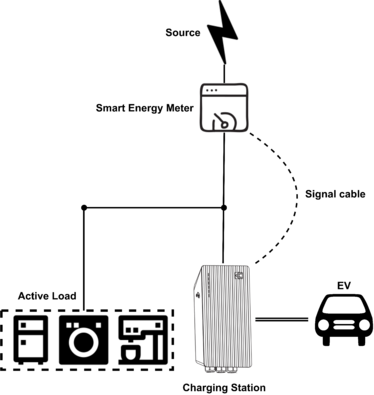
TeltoCharge have the ability to communicate with dedicated smart energy meter and regarding to its readings, adjust used electrical power. Such functionality allows to protect house electrical grid from overload in peak hours and optimize energy usage to meet user habits. Smart energy meter should always be installed in source electrical cabinet as showed below.
Smart meter and TeltoCharge communication
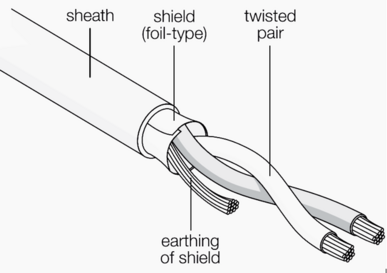
Smart meter and TeltoCharge communicates via Modbus RS-485 protocol. In order to achieve smooth communication, it is recommended to use communication cable according to this protocol. Check example below
Note: Communication cable should be integrated with power cable.
Supported energy meters
In order to strive for wider applicability and compatibility, we constantly test and add new supported devices into list. All of the supported Energy meters and schematics how to connect them are provided below.
TeltoCharge supported smart energy meters
| Energy meter manufacturer | Technical information | Configuration in mobile application | |
|---|---|---|---|
| Carlo Gavazzi series 1-3 |
EM and ET models |
Carlo Gavazzi settings | |
| Siemens PACxxxx |
PAC models |
Siemens settings | |
| ABB A4x ; B2x |
A and B models |
ABB settings | |
| Eastron SDMxx |
SMD models |
Eastron settings | |
| Inepro PRO380 |
PRO model | Inepro settings | |
| More coming soon... | |||

