Difference between revisions of "Solar integration"
From Wiki
m |
m |
||
| Line 9: | Line 9: | ||
<h2 style="color: #4a4a4a; font-size: 24px; font-weight: bold; margin-bottom: 10px;"> Physical installation </h2> | <h2 style="color: #4a4a4a; font-size: 24px; font-weight: bold; margin-bottom: 10px;"> Physical installation </h2> | ||
<ul style="list-style-type: none; margin: 0; padding: 0;"> | <ul style="list-style-type: none; margin: 0; padding: 0;"> | ||
| − | *To ensure proper solar integration functionality, it is essential to begin with the correct physical installation. This involves having a smart energy meter installed in the electric circuit that possesses the necessary communication functionality and is included in the energy meter whitelist. The meter plays a crucial role in detecting negative current flow, indicating when energy consumption is lower than solar generation, and feeding it back into the electrical grid. For effective communication, the charger must be interconnected with the meter. | + | *To ensure proper solar integration functionality, it is essential to begin with the correct physical installation. This involves having a smart energy meter installed in the electric circuit that possesses the necessary communication functionality and is included in the [[Smart energy meters|energy meter whitelist]]. The meter plays a crucial role in detecting negative current flow, indicating when energy consumption is lower than solar generation, and feeding it back into the electrical grid. For effective communication, the charger must be interconnected with the meter. |
*When the meter detects surplus energy, it relays this information to the charger. Based on the charger's internal configurations, it will determine whether to initiate the charging process or not. It is important to note that this process depends on the specific configurations set within the charger. | *When the meter detects surplus energy, it relays this information to the charger. Based on the charger's internal configurations, it will determine whether to initiate the charging process or not. It is important to note that this process depends on the specific configurations set within the charger. | ||
| + | *More information about smart meter set-up can be found here | ||
[[File:Solar integration overview.png|frameless|1200x900px]] | [[File:Solar integration overview.png|frameless|1200x900px]] | ||
| − | + | <h2 style="color: #4a4a4a; font-size: 24px; font-weight: bold; margin-bottom: 10px;"> Solar configuration </h2> | |
| − | <h2 style="color: #4a4a4a; font-size: 24px; font-weight: bold; margin-bottom: 10px;"> Solar | ||
<ul style="list-style-type: none; margin: 0; padding: 0;"> | <ul style="list-style-type: none; margin: 0; padding: 0;"> | ||
| − | + | Once the charger is properly connected to the electrical grid and interconnected with energy meter, the next step is to configure the settings using the Teltonika Energy app. Below, you will find a comprehensive list of the settings that should be adjusted to achieve DLM functionality.<ul style="list-style-type: none; margin: 0; padding: 0;"> | |
| − | |||
| − | |||
| − | |||
| − | |||
| − | |||
| − | |||
| − | |||
| − | |||
| − | |||
| − | |||
| − | |||
| − | |||
| − | |||
| − | |||
Revision as of 08:02, 3 July 2023
Main Page > TeltoCharge > Advanced Topics > Solar integrationSolar overview
-
Solar integration with electric vehicle (EV) charging stations is an innovative and sustainable approach that combines solar power generation with the charging infrastructure for electric vehicles. Couple examples why this integration is important:
- Solar-integrated TeltoCharge can be connected to the local electrical grid, allowing it to draw power from the grid when solar energy production is insufficient or when there is a high demand for charging. This ensures uninterrupted charging availability for EV owners.
- Solar Power Offset: When solar panels produce excess electricity that is not immediately consumed by TeltoCharge, it can be fed back into the electrical grid. This process, known as net metering or feed-in tariff, allows the solar system owner to earn credits or receive compensation for the surplus energy supplied.
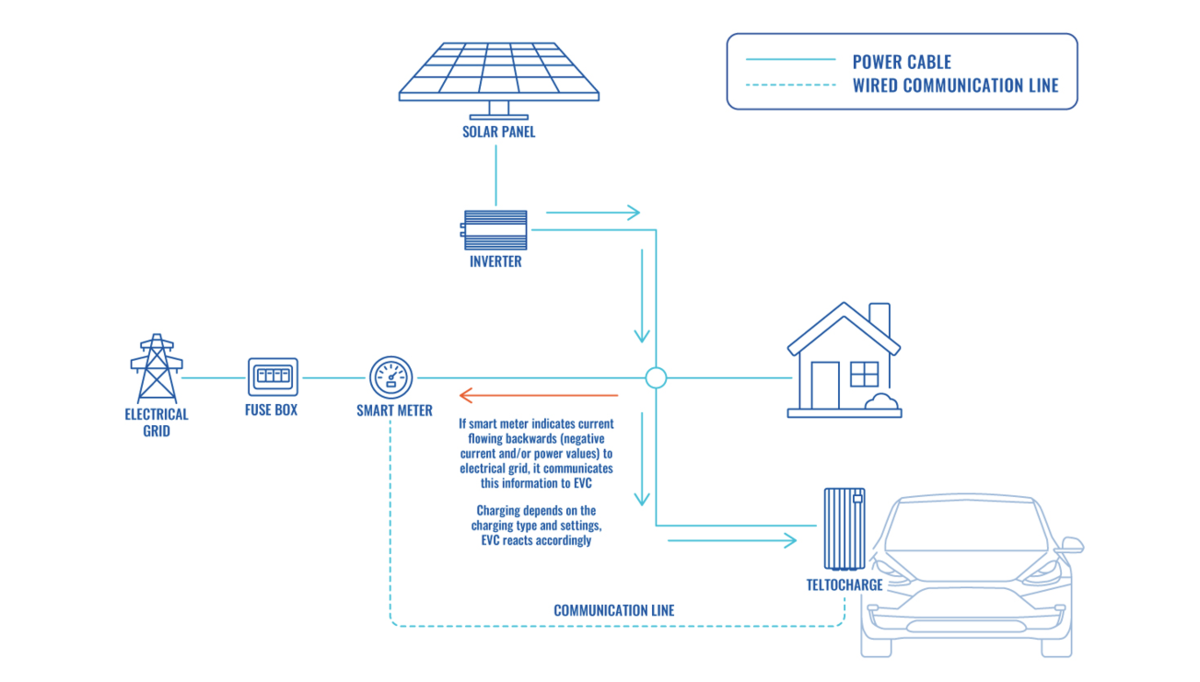
- To ensure proper solar integration functionality, it is essential to begin with the correct physical installation. This involves having a smart energy meter installed in the electric circuit that possesses the necessary communication functionality and is included in the energy meter whitelist. The meter plays a crucial role in detecting negative current flow, indicating when energy consumption is lower than solar generation, and feeding it back into the electrical grid. For effective communication, the charger must be interconnected with the meter.
- When the meter detects surplus energy, it relays this information to the charger. Based on the charger's internal configurations, it will determine whether to initiate the charging process or not. It is important to note that this process depends on the specific configurations set within the charger.
- More information about smart meter set-up can be found here
Physical installation

Solar configuration
-
Once the charger is properly connected to the electrical grid and interconnected with energy meter, the next step is to configure the settings using the Teltonika Energy app. Below, you will find a comprehensive list of the settings that should be adjusted to achieve DLM functionality.