Difference between revisions of "Installation process (NA)"
m |
|||
| (33 intermediate revisions by 3 users not shown) | |||
| Line 94: | Line 94: | ||
== Product code structure == | == Product code structure == | ||
| + | |||
| + | On the product Middle plate you can find markings showing its Product name and code, Certifications, Serial number and more. | ||
| + | [[File:Marking draft US .png|none|thumb|312x312px]] | ||
{| class="wikitable" style="text-align: left;" | {| class="wikitable" style="text-align: left;" | ||
|Model||Version||Power||Connector||Connectivity || Front plate color | |Model||Version||Power||Connector||Connectivity || Front plate color | ||
| Line 121: | Line 124: | ||
== Required tools == | == Required tools == | ||
| − | [[File:TeltoCharge Installation RequiredTools RequiredTools.PNG | + | [[File:TeltoCharge Installation RequiredTools RequiredTools.PNG|frameless|551x551px]] |
| + | |||
| + | List of required tools include:<br> | ||
| + | |||
| + | '''A''' - Hammer<br> | ||
| + | '''B''' - Electric drill<br> | ||
| + | '''C''' - Pencil<br> | ||
| + | '''D''' - Screwdriver<br> | ||
| + | '''E''' - Cutting pliers<br> | ||
| + | '''F''' - Allen key 2,5 mm<br> | ||
| + | '''G''' - Measuring tape<br> | ||
| + | '''H''' - Utility knife<br> | ||
| + | '''I''' - Level<br> | ||
| + | '''J''' - Drill bit D6 | ||
== Included Mounting parts == | == Included Mounting parts == | ||
| − | [[File:TeltoCharge Installation IncludedMountingParts IncludedMountingParts.PNG | + | [[File:TeltoCharge Installation IncludedMountingParts IncludedMountingParts.PNG|frameless|538x538px]] |
| − | == EV Charger | + | Included in the box you will find:<br> |
| − | [[File:TeltoCharge Installation MainElements US.png | + | |
| + | '''K''' - Wall plugs 6x35 mm<br> | ||
| + | '''L''' - Pan head self-tapping screws galvanized steel<br> | ||
| + | '''M''' - DIN912 M3x8 screws<br> | ||
| + | '''N''' - Cable gland<br> | ||
| + | '''O''' - Rubber washer<br> | ||
| + | |||
| + | == EV Charger Main elements == | ||
| + | |||
| + | |||
| + | [[File:TeltoCharge Installation MainElements US.png|frameless]] | ||
==Site preparation requirements == | ==Site preparation requirements == | ||
| Line 143: | Line 169: | ||
[[File:TeltoCharge Installation InstallationProcess HousingInstallation.png|border|frameless|214x214px]] | [[File:TeltoCharge Installation InstallationProcess HousingInstallation.png|border|frameless|214x214px]] | ||
| − | + | Fix the device on the wall by inserting the self-tapping screws with rubber washers (start with the top screw and make sure the housing is horizontal) | |
| − | |||
===Electrical wiring=== | ===Electrical wiring=== | ||
| − | [[File: | + | [[File:TeltoCharge Installation ElectricalWiring US.png|frameless]] |
| − | |||
| − | |||
| − | ''' | + | '''Network type:'''<br> |
| + | A - IT/TT two phase set up. | ||
| − | + | '''Notice 1:''' Products EVC131 (32Amp) and EVC141 (40 Amp) come with pre-wired NEMA 6-50 plug. These models have to be connected to pro properly selected wall socket which meets the same NEMA 6-50 standard.<br> | |
| + | '''Notice 2:''' Voltages in different installations may vary. Please check configuration of Installer menu Connection type settings in mobile application and select either delta or star connection. | ||
===Closing the middle panel=== | ===Closing the middle panel=== | ||
| − | [[File:TeltoCharge Installation | + | [[File:TeltoCharge Installation ClosingMiddlePanel US.png|frameless|235x235px]] |
'''A''' - Place a middle panel on the housing and press it, till it clicks. | '''A''' - Place a middle panel on the housing and press it, till it clicks. | ||
| Line 163: | Line 188: | ||
===Closing the front plate;=== | ===Closing the front plate;=== | ||
| − | [[File:TeltoCharge Installation | + | [[File:TeltoCharge Installation ClosingFrontPanel US.png|frameless|300x300px]] |
| + | |||
| + | '''C''' - Lock the top of the plate; | ||
| − | ''' | + | '''D''' - Lock the bottom of the plate; |
| − | ''' | + | '''E''' - Fix it using DIN912 M3x8 screws; |
| − | + | == LED indicators == | |
| − | + | Information about how LED indicators signal different states can be obtained from [[LED indicators|here]] | |
| − | ''' | + | ==Mobile application== |
| + | |||
| + | ===Connection to the EV charger=== | ||
| + | '''Step 1''' - Download the Teltonika Energy App<br> | ||
| + | |||
| + | [[File:Teltocharge Installation AppDownload QR.png|frameless|center]] | ||
| + | '''Step 2''' - Pair a charger and mobile device using Bluetooth. Device will ask to insert Pairing code which is represented by last 6 digits of Installer code. Sticker with security code can be found on the Middle plate.<br> | ||
| + | |||
| + | [[File:Teltocharge Installation SecurityCode Sticker.png|frameless|center]] | ||
| − | + | *More details on pairing procedure can be found in [[App_FAQ|FAQ]] section of Wiki page. | |
| − | + | ===Basic parameters=== | |
| + | [[File:Teltocharge_Installation_FirstSetupWizard_CurrencyPanel.png|alt=|frameless|400x400px]][[File:Teltocharge_Installation_FirstSetupWizard_AuthorizationPanel.png|alt=|frameless|400x400px]]<br> | ||
| − | + | '''SET UP BASIC PARAMETERS'''<br> | |
| − | + | '''Step 1''' - Type the EV charger name<br> | |
| + | '''Step 2''' - Set currency<br> | ||
| + | '''Step 3''' - Set average price of kWh<br> | ||
| + | '''Step 4''' - In the next window enable authorization (if needed)<br> | ||
| + | '''Step 5''' - Set installer parameters<br> | ||
| + | '''Step 6''' - Confirm changes<br> | ||
| + | ===Installer parameters=== | ||
| + | [[File:Teltocharge Installation InstallerMenu.png|frameless|center|alt=|776x776px]]<br> | ||
| + | '''SET UP BASIC PARAMETERS'''<br> | ||
| + | '''A''' - Installer menu can be reached via:<br> | ||
| + | * first time connection wizard window<br> | ||
| + | * APP settings<br> | ||
| + | '''B''' - Every time an installer will be requested to type in a security code. Originally, the code can be found on the middle plate | ||
| + | sticker. Please remember the place if you replace it.<br> | ||
| + | '''C''' - If the security code is typed correctly, the installer can reach Installer parameters. Updated and detailed explanation can be | ||
| + | found in the Teltonika Energy [[Functionalities#Installer_menu|APP functions Wiki page]] <br> | ||
| + | ==Safety and maintenance notes== | ||
| + | <br> | ||
| + | Installation, maintenance, and servicing of the charger must be done only by the personnel with relevant qualifications under the applicable local regulations. Unauthorized installation and modifications make the manufacturer’s warranty void. | ||
| + | Do not use the charger if the enclosure or connector is cracked, opened, broken, or shows any other indication of damage. If the connector begins to melt or emits smoke, do not touch it. If possible, stop charging activities. | ||
| + | Before opening the cover or cleaning the charger, power down the device. Do not use cleaning solvents on any part of the charger. Use a clean, dry cloth to remove dust and dirt. Do not open the cover in the rain. | ||
| + | Use the TeltoCharge charger under the operating parameters and within normal ambient conditions specified in the General and Electrical Specifications. Avoid installing the charger in a place that is under extreme weather conditions or is directly impacted by sunlight.<br> | ||
| + | '''SIMPLIFIED DECLARATION OF CONFORMITY'''<br> | ||
| + | Hereby, Teltonika Energy declares that TeltoCharge equipment is in compliance with UL2594 and UL 2331.<br> | ||
| + | '''SAFETY RECOMMENDATIONS'''<br> | ||
| + | Follow all the safety and installation instructions carefully. | ||
| + | Failure to follow instructions may be a safety hazard and/or cause equipment malfunction. | ||
| + | Any resulting damage due to disregard or actions contrary to the instructions in this manual is excluded from the product warranty.<br> | ||
| + | '''CONNECTOR RECOMMENDATIONS AND INSTALLATION INSTRUCTIONS'''<br> | ||
| + | Do not use if the charging cable is frayed, has broken insulation, or has any signs of damage or the vehicle plug or electrical outlet is dirty, wet, or damaged. | ||
| + | Do not use the charging cable with a cable adaptor or an extension cable. | ||
| + | Under any circumstances, do not tighten the charging cable while it is connected.<br> | ||
| + | '''INSTALLATION INSTRUCTIONS'''<br> | ||
| + | Ensure that the mounting surface can adequately support the weight of the charger and withstand mechanical forces associated with usage. | ||
| + | The charger must be permanently connected to the electrical Earth of the installation. | ||
| + | Do not install the charger in direct sunlight, or near flammable, explosive, or combustible materials, chemicals or solvents, gas pipes or steam outlets, radiators or batteries, and areas prone to flooding, high humidity and running water.<br> | ||
| + | '''ELECTRICAL PROTECTION'''<br> | ||
| + | The power supply line must be wired to an existing installation and be in accordance with local regulations.<br> | ||
| + | '''DISPOSAL ADVICE'''<br> | ||
| + | In accordance with the Directive 2012/19/EC, at the end of its useful life, the product should not be disposed of as urban waste. It should be taken to a collection center or to a distributor that provides special and differentiated waste disposal.<br> | ||
| − | + | '''LEGAL NOTICE'''<br> | |
| + | Any information in this manual may be changed without prior notice and does not represent any obligation on the part of | ||
| + | the manufacturer. Images in this manual are for illustration purposes only and might differ from the delivered product.<br> | ||
Latest revision as of 21:39, 30 March 2023
General specifications
Teltocharge tethered with Type 1 cable
| Dimensions without cable | 170x341x97 mm |
| Weight without cable | 2.8 kg |
| Operating temperature | -30°C - +50°C |
| IP rating | IP55 |
| IK rating | IK10 |
| Certification | UL2594 |
| In compliance with | IEC 61851-1 |
Electrical specifications
Here you can find information about electric parameters of Teltocharge product
| AC INPUT SPECIFICATIONS | |||
|---|---|---|---|
| Maximum power | 7,6 kW | 9,6 kW | 11,5 kW |
| Input AC power connection | 2 phases | ||
| Maximum current | 32 A | 40 A | 48 A |
| Input voltage | 2 phases: (L-L) 240 ± 10% VAC | ||
| Rated frequency | 50 / 60 HZ | ||
| Standby power consumption | 4 W | ||
| Earth (ground) fault protection | 20 mA AC, 6 mA DC | ||
| Overvoltage category | OVC II | ||
| Protection against electric shock | Class I | ||
| AC Output specifications | |||
| AC output voltage range | 1 phase: (L-N) 240 ± 10% VAC | ||
| Connection Standart | Type 1 cable | ||
| Connection to the grid | NEMA 6-50 plug to the wall socket | Direct cable from house grid
(Hardwired) | |
| Power Cable | |||
| Maximum cable diameter | 17.5 mm | 20,75 mm | |
| Maximum wire cross section | 7.5 mm2 | ||
Product code structure
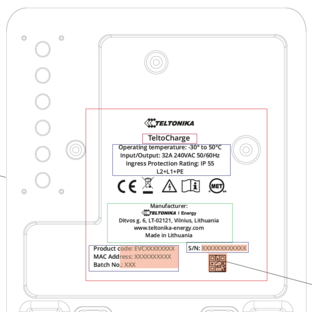
On the product Middle plate you can find markings showing its Product name and code, Certifications, Serial number and more.
| Model | Version | Power | Connector | Connectivity | Front plate color | Front plate finish |
| A | B | C | D | E | F | G |
| EVC | 1 - V1 | 3 - US 7,6 kW, 1/2P, 32A, 120/240V
4 - US 9,6 kW, 1/2P, 40A, 120/240V 5 - US 11.5kW, 1/2P, 48A, 120/240V |
1 - Tethered cable | 0 - Without GSM modem | P - Gray
R - Red M - Blue B - White 0 - N/A |
0 – Without front panel
1 – Tethered cable |
Required tools
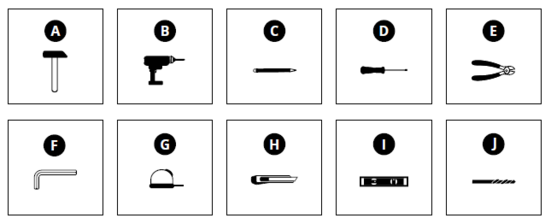
List of required tools include:
A - Hammer
B - Electric drill
C - Pencil
D - Screwdriver
E - Cutting pliers
F - Allen key 2,5 mm
G - Measuring tape
H - Utility knife
I - Level
J - Drill bit D6
Included Mounting parts
Included in the box you will find:
K - Wall plugs 6x35 mm
L - Pan head self-tapping screws galvanized steel
M - DIN912 M3x8 screws
N - Cable gland
O - Rubber washer
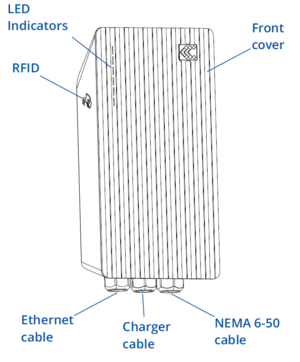
EV Charger Main elements
Site preparation requirements
- Find a suitable site on a wall (The mounting surface required to be flat and stable, for example a finished, brick or concrete wall. Wall required to be suitable to withstand TeltoCharge weight with charging cable).
- Make sure that the required power supply is easily accessible. (Required power supply depends on the type of charger).
- Recommendation is not to install TeltoCharge on direct sunlight to avoid overheating.
Installation process
Housing Installation
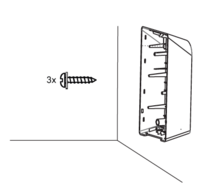
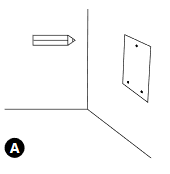 A - Place the drilling template on the wall and mark the three fixing points.
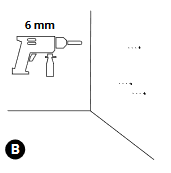 B - Drill holes where the fixing points are marked.
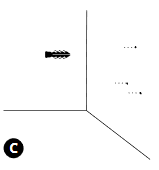 C - Insert the wall plugs into the fixing holes.
Fix the device on the wall by inserting the self-tapping screws with rubber washers (start with the top screw and make sure the housing is horizontal)
Electrical wiring
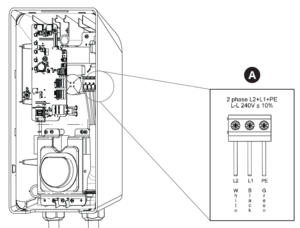
Network type:
A - IT/TT two phase set up.
Notice 1: Products EVC131 (32Amp) and EVC141 (40 Amp) come with pre-wired NEMA 6-50 plug. These models have to be connected to pro properly selected wall socket which meets the same NEMA 6-50 standard.
Notice 2: Voltages in different installations may vary. Please check configuration of Installer menu Connection type settings in mobile application and select either delta or star connection.
Closing the middle panel
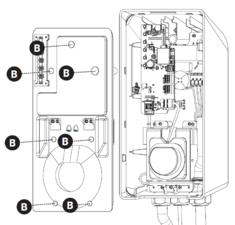
A - Place a middle panel on the housing and press it, till it clicks.
B - Fix it using DIN912 M3x8 screws;
Closing the front plate;
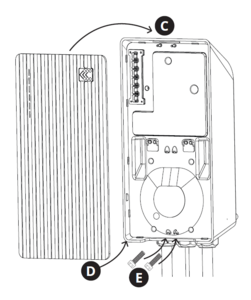
C - Lock the top of the plate;
D - Lock the bottom of the plate;
E - Fix it using DIN912 M3x8 screws;
LED indicators
Information about how LED indicators signal different states can be obtained from here
Mobile application
Connection to the EV charger
Step 1 - Download the Teltonika Energy App
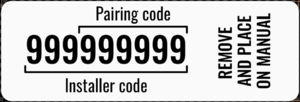
Step 2 - Pair a charger and mobile device using Bluetooth. Device will ask to insert Pairing code which is represented by last 6 digits of Installer code. Sticker with security code can be found on the Middle plate.
- More details on pairing procedure can be found in FAQ section of Wiki page.
Basic parameters
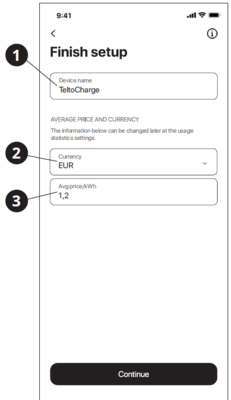
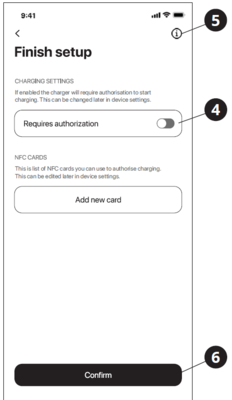
SET UP BASIC PARAMETERS
Step 1 - Type the EV charger name
Step 2 - Set currency
Step 3 - Set average price of kWh
Step 4 - In the next window enable authorization (if needed)
Step 5 - Set installer parameters
Step 6 - Confirm changes
Installer parameters
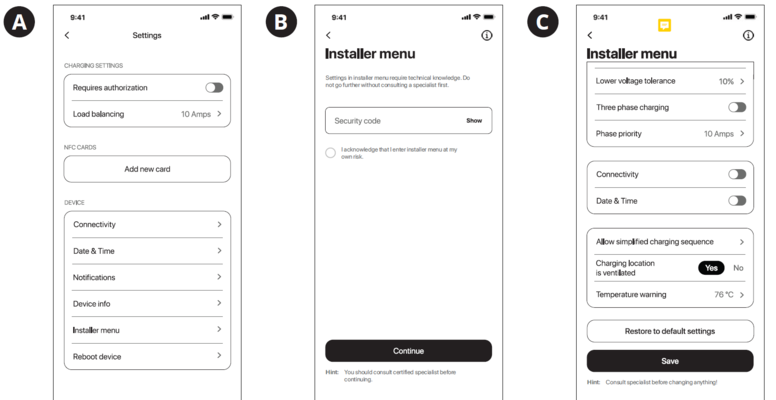
SET UP BASIC PARAMETERS
A - Installer menu can be reached via:
- first time connection wizard window
- APP settings
B - Every time an installer will be requested to type in a security code. Originally, the code can be found on the middle plate
sticker. Please remember the place if you replace it.
C - If the security code is typed correctly, the installer can reach Installer parameters. Updated and detailed explanation can be
found in the Teltonika Energy APP functions Wiki page
Safety and maintenance notes
Installation, maintenance, and servicing of the charger must be done only by the personnel with relevant qualifications under the applicable local regulations. Unauthorized installation and modifications make the manufacturer’s warranty void.
Do not use the charger if the enclosure or connector is cracked, opened, broken, or shows any other indication of damage. If the connector begins to melt or emits smoke, do not touch it. If possible, stop charging activities.
Before opening the cover or cleaning the charger, power down the device. Do not use cleaning solvents on any part of the charger. Use a clean, dry cloth to remove dust and dirt. Do not open the cover in the rain.
Use the TeltoCharge charger under the operating parameters and within normal ambient conditions specified in the General and Electrical Specifications. Avoid installing the charger in a place that is under extreme weather conditions or is directly impacted by sunlight.
SIMPLIFIED DECLARATION OF CONFORMITY
Hereby, Teltonika Energy declares that TeltoCharge equipment is in compliance with UL2594 and UL 2331.
SAFETY RECOMMENDATIONS
Follow all the safety and installation instructions carefully.
Failure to follow instructions may be a safety hazard and/or cause equipment malfunction.
Any resulting damage due to disregard or actions contrary to the instructions in this manual is excluded from the product warranty.
CONNECTOR RECOMMENDATIONS AND INSTALLATION INSTRUCTIONS
Do not use if the charging cable is frayed, has broken insulation, or has any signs of damage or the vehicle plug or electrical outlet is dirty, wet, or damaged.
Do not use the charging cable with a cable adaptor or an extension cable.
Under any circumstances, do not tighten the charging cable while it is connected.
INSTALLATION INSTRUCTIONS
Ensure that the mounting surface can adequately support the weight of the charger and withstand mechanical forces associated with usage.
The charger must be permanently connected to the electrical Earth of the installation.
Do not install the charger in direct sunlight, or near flammable, explosive, or combustible materials, chemicals or solvents, gas pipes or steam outlets, radiators or batteries, and areas prone to flooding, high humidity and running water.
ELECTRICAL PROTECTION
The power supply line must be wired to an existing installation and be in accordance with local regulations.
DISPOSAL ADVICE
In accordance with the Directive 2012/19/EC, at the end of its useful life, the product should not be disposed of as urban waste. It should be taken to a collection center or to a distributor that provides special and differentiated waste disposal.
LEGAL NOTICE
Any information in this manual may be changed without prior notice and does not represent any obligation on the part of
the manufacturer. Images in this manual are for illustration purposes only and might differ from the delivered product.
