(2 intermediate revisions by the same user not shown)
Line 2:
Line 2:
== Physical installation ==
== Physical installation ==
*aTo ensure proper solar integration functionality, it is essential to begin with the correct physical installation. This involves having a smart energy meter installed in the electric circuit that possesses the necessary communication functionality and is included in our [[Smart energy meters|energy meter list]]. The meter plays a crucial role in detecting negative current flow, indicating when energy consumption is lower than solar generation, and feeding it back into the electrical grid. For effective communication, the charger must be interconnected with the meter.
*To ensure proper solar integration functionality, it is essential to begin with the correct physical installation. This involves having a smart energy meter installed in the electric circuit that possesses the necessary communication functionality and is included in our [[Smart energy meters|energy meter list]]. The meter plays a crucial role in detecting negative current flow, indicating when energy consumption is lower than solar generation, and feeding it back into the electrical grid. For effective communication, the charger must be interconnected with the meter.
*When the meter detects surplus energy, it relays this information to the charger. Based on the charger's internal configurations, it will determine whether to initiate the charging process or not. It is important to note that this process depends on the specific configurations set within the charger.
*When the meter detects surplus energy, it relays this information to the charger. Based on the charger's internal configurations, it will determine whether to initiate the charging process or not. It is important to note that this process depends on the specific configurations set within the charger.
Line 34:
Line 34:
#[[File:ECO.png|frameless||thumb|none]]'''ECO charging minimum''' - This setting specifies the minimum value required to commence the charging process.
#[[File:ECO.png|frameless||thumb|none]]'''ECO charging minimum''' - This setting specifies the minimum value required to commence the charging process.
#[[File:ECO+.png||frameless|thumb|none]]'''ECO+ surplus minimum''' - This setting requires the minimum value of surplus solar energy to be reached in order to initiate a charging session. If the minimum value of surplus energy is not achieved, the charger will remain in "On hold" mode, awaiting additional surplus energy.
#[[File:ECO+.png||frameless|thumb|none]]'''ECO+ surplus minimum''' - This setting requires the minimum value of surplus solar energy to be reached in order to initiate a charging session. If the minimum value of surplus energy is not achieved, the charger will remain in "On hold" mode, awaiting additional surplus energy.
#[[File:ECO+.png||frameless|thumb|none]]'''No export (Adaptive solar)''' - This mode aims to maximize solar usage without exporting energy to the grid.
#[[File:ECO+.png||frameless|thumb|none]]'''Export priority''' - This setting prioritizes export up to a threshold before enabling EV charging.
== Charging mode explanation ==
== Charging mode explanation ==
Line 54:
Line 56:
:
:
:[[File:EVC2 eco 1 phase v2.png|800x800px]]
:[[File:EVC2 eco 1 phase v2.png|800x800px]]
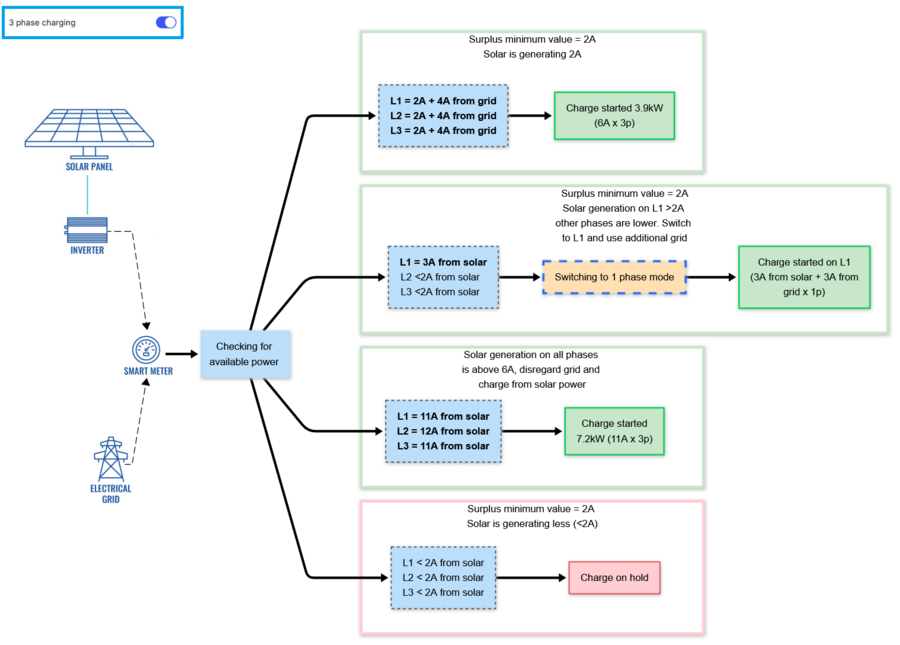
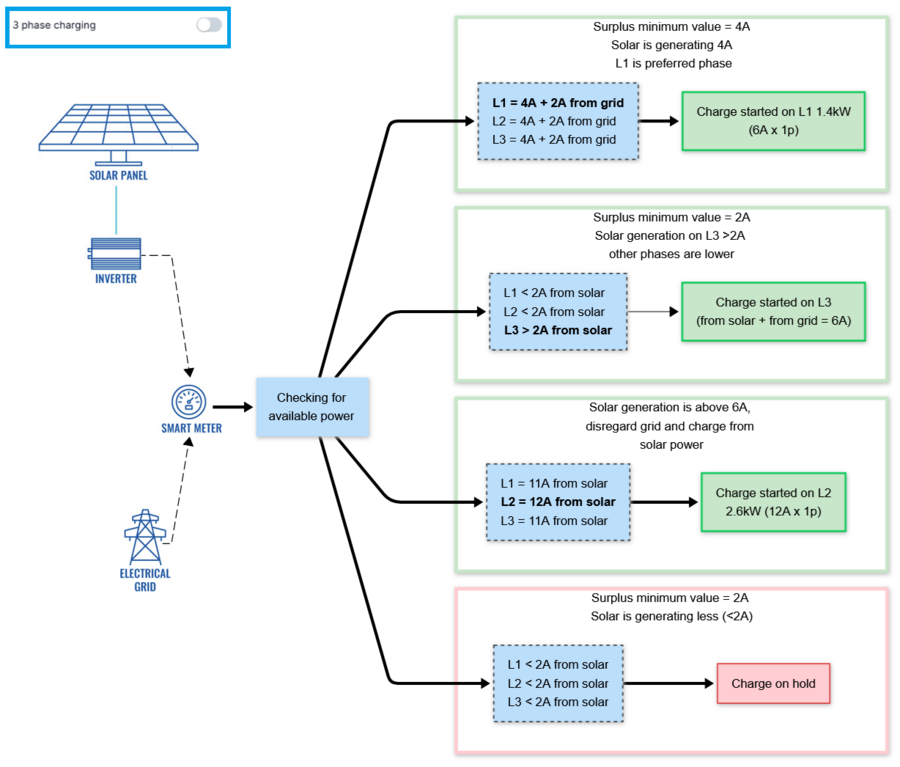
*'''ECO+ charging profile''' - In this profile, the charging process is initiated using a combination of solar energy and grid energy. The user sets the ECO+ surplus minimum value, which determines the minimum surplus energy required to start the charging process. If the set value is less than 6A, the difference in current will be supplemented with grid power.
*'''ECO+ charging profile''' - In this profile, the charging process is initiated using a combination of solar energy and grid energy. The user sets the ECO+ surplus minimum value, which determines the minimum surplus energy required to start the charging process. If the set value is less than '''6A''', the difference in current will be supplemented with grid power.
:'''3 phase charging examples:'''
:'''3 phase charging examples:'''
Line 61:
Line 63:
:'''Single phase charging examples:'''
:'''Single phase charging examples:'''
:[[File:EVC2 ecoplus 1 phase v2.png|900x900px]]
:[[File:EVC2 ecoplus 1 phase v2.png|900x900px]]
*'''No export (Adaptive solar) charging profile''' - This setting actively adjusts the charger's output, aiming to use as much of the generated power as possible. <br>
:After starting at a minimum output of '''6A''', it uses real-time meter data to adjust to the current exported current. Once grid import is detected, the charging current is instead reduced. <br>
:Designed for systems where grid export is undesirable
:'''3 phase charging examples:'''
:'''Single phase charging examples:'''
*'''Export priority charging profile''' - In this mode, the user is able to set a minimum current that has to be exported before charging is initiated. Charging begins only if this minimum generation is exceeded by '''6A''' or more.<br>
:Useful when power export is economically beneficial or within systems prioritizing grid feed-in compliance.
To ensure proper solar integration functionality, it is essential to begin with the correct physical installation. This involves having a smart energy meter installed in the electric circuit that possesses the necessary communication functionality and is included in our energy meter list. The meter plays a crucial role in detecting negative current flow, indicating when energy consumption is lower than solar generation, and feeding it back into the electrical grid. For effective communication, the charger must be interconnected with the meter.
When the meter detects surplus energy, it relays this information to the charger. Based on the charger's internal configurations, it will determine whether to initiate the charging process or not. It is important to note that this process depends on the specific configurations set within the charger.
Solar settings
Once the charger is properly connected to the electrical grid and interconnected with the energy meter, the next step is to configure the settings using the Teltonika Energy app.
Below, you will find a comprehensive list of the settings that should be adjusted to achieve solar functionality.
Open "User Menu"
Open "Installer Menu"
Open "Dynamic Load Balancing" menu
Enable "Load Balancing"
Enable "Solar Charging"
If smart meter is connected with RS485 wires, press "Search For Device"
*ONLY If TeltoCharge is unable to identify energy meter - use "Manual Setup"
Charging modes
From Charging menu, user you will be able to select which Charging mode shall be used for the next session and adjust the solar mode’s charging output
Frameless
Solar modes could be switched in the middle of the charging process.
thumb
thumbSolar only - This setting specifies charging process is initiated solely using green energy. (The minimum required value is 6 Amps)
thumbECO charging minimum - This setting specifies the minimum value required to commence the charging process.
thumbECO+ surplus minimum - This setting requires the minimum value of surplus solar energy to be reached in order to initiate a charging session. If the minimum value of surplus energy is not achieved, the charger will remain in "On hold" mode, awaiting additional surplus energy.
thumbNo export (Adaptive solar) - This mode aims to maximize solar usage without exporting energy to the grid.
thumbExport priority - This setting prioritizes export up to a threshold before enabling EV charging.
Charging mode explanation
This section demonstrates the charger's behavior in various configurations and its response to fluctuations in available solar power. In these examples we'll be using 3 phases as input for the charger. For detailed information on diagnosing the power draw on each phase, please check this app guide. The TeltoCharge EV charger offers three solar charging modes, each providing unique benefits for different situations:
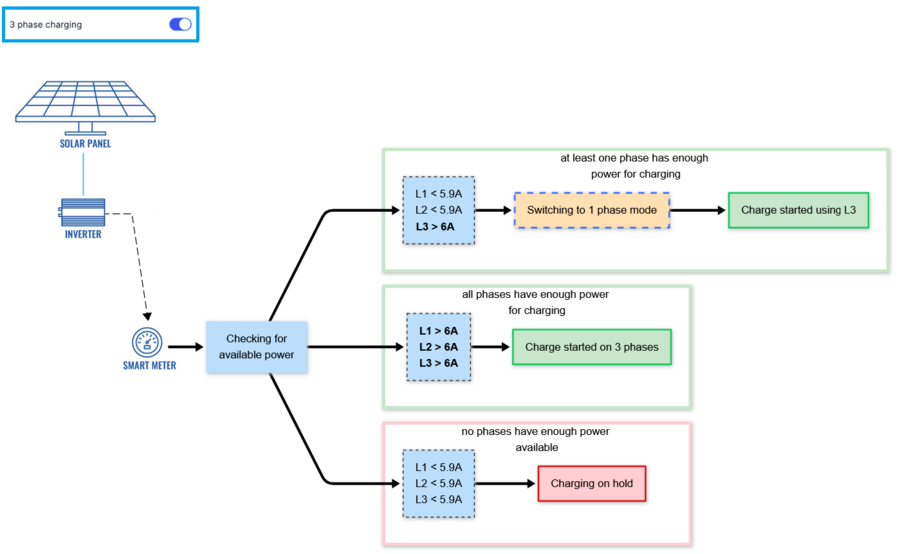
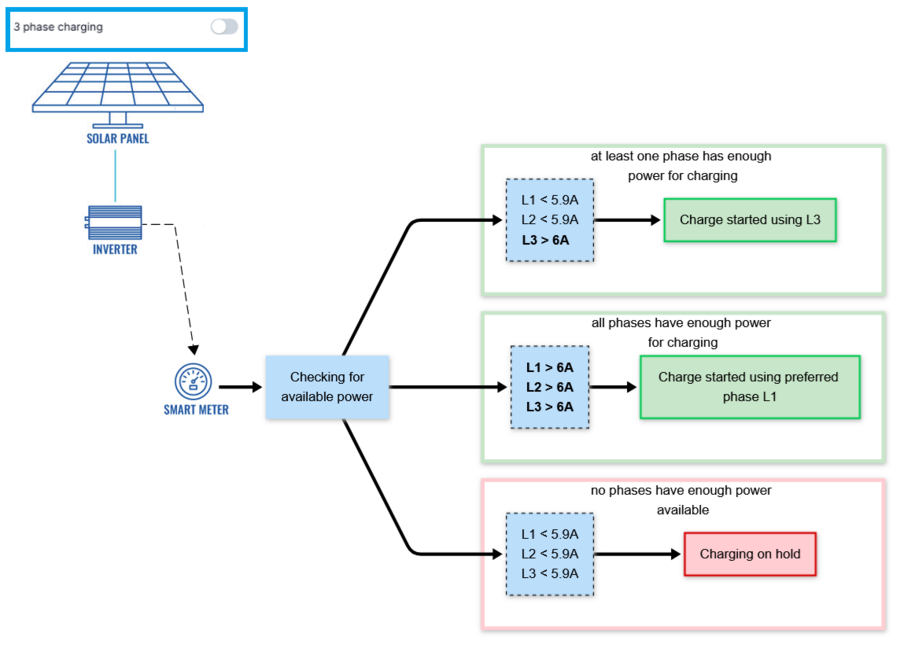
Solar only charging profile - In this profile, the charging process is initiated solely using green energy. The minimum of 6A is required to charge the EV. If there is less surplus energy available than 6A, the charger will remain in "On hold" mode.
3 phase charging examples:
Single phase charging examples:
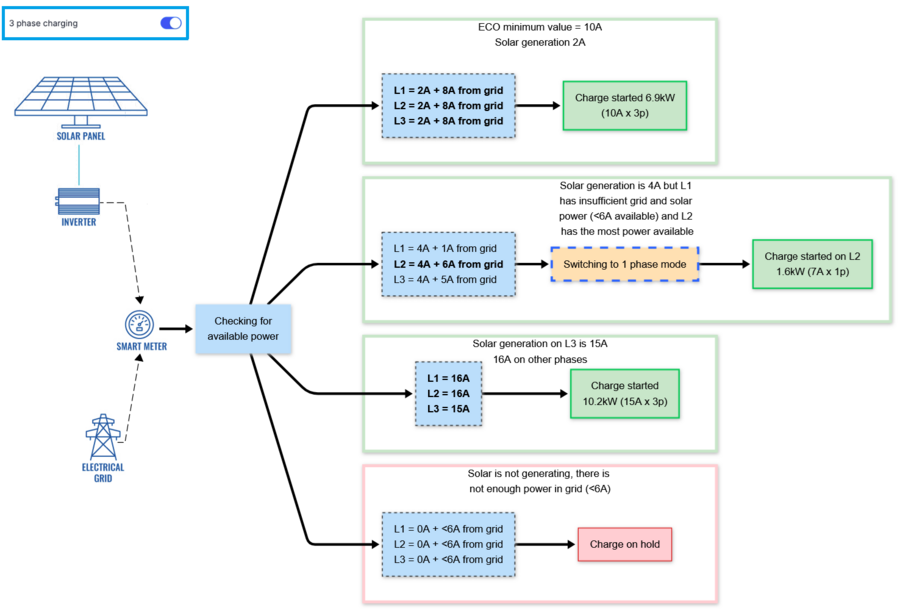
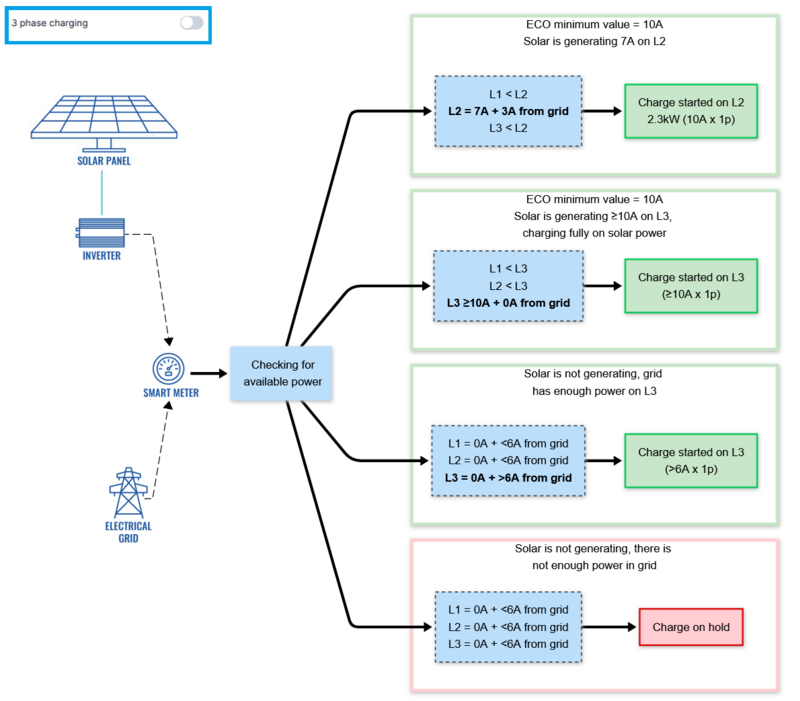
ECO charging profile - In this mode, charging begins by combining available solar power with energy from the grid. Smart meter is required to measure the power available on each phase. In the following examples, the "from grid" value indicates the amount of available power used from the grid. A minimum of 6A is required to charge the EV.
The user sets ECO minimum value, which is the minimum charging current the solar power will be used for. The system prioritizes using all available solar power to meet this target, supplementing it with grid power only as needed. However, if no solar power is being generated, the charger will still use the grid to charge the vehicle, provided enough power is available.
3 phase charging examples:
Single phase charging examples:
ECO+ charging profile - In this profile, the charging process is initiated using a combination of solar energy and grid energy. The user sets the ECO+ surplus minimum value, which determines the minimum surplus energy required to start the charging process. If the set value is less than 6A, the difference in current will be supplemented with grid power.
3 phase charging examples:
Single phase charging examples:
No export (Adaptive solar) charging profile - This setting actively adjusts the charger's output, aiming to use as much of the generated power as possible.
After starting at a minimum output of 6A, it uses real-time meter data to adjust to the current exported current. Once grid import is detected, the charging current is instead reduced.
Designed for systems where grid export is undesirable
3 phase charging examples:
Single phase charging examples:
Export priority charging profile - In this mode, the user is able to set a minimum current that has to be exported before charging is initiated. Charging begins only if this minimum generation is exceeded by 6A or more.
Useful when power export is economically beneficial or within systems prioritizing grid feed-in compliance.
3 phase charging examples:
Single phase charging examples:
Additional information
There is additional information that is important to know when using solar integration, specifically regarding timers that dictate the start and stop of the charging process.
If the Solar or ECO+ mode is being utilized and there is a sudden shortage of solar power to charge the electric vehicle, the charger will compensate by drawing charging power from the grid for the following 30 seconds and limiting the maximum current to 6 A until enough solar power is available. If no sufficient solar power is available after 30 seconds, the charger will transition to the "On hold" state and await the availability of additional surplus energy. Once there is sufficient surplus energy, the charger initiates a 2-minute timer during which it verifies the sustained presence of enough solar energy. After the 2-minute interval elapses, the charger proceeds to the charging process.
This mechanism ensures that the charging process is flexible and responsive to variations in solar energy availability. By incorporating timers and checks, the charger optimizes the utilization of solar power while maintaining a reliable and efficient charging experience for electric vehicle owners.