Functionalities EVC2: Difference between revisions
m KarolisS moved page FunctionalitiesEVC2 to Functionalities EVC2 without leaving a redirect: Misspelled title |
|||
| (8 intermediate revisions by the same user not shown) | |||
| Line 35: | Line 35: | ||
| Reserved || 9 || N/A || N/A || N/A | | Reserved || 9 || N/A || N/A || N/A | ||
|} | |} | ||
='''NEW:''' IT grid support= | |||
Enable this setting if the charger is installed on an IT grid. <br> | |||
When turned on, the charging station adapts its voltage monitoring for IT grid operation, where voltage can be floating in relation to protective earth (PE). | |||
='''NEW:''' Button switch= | ='''NEW:''' Button switch= | ||
This switch could be found on the interface board, It has 2 features: | This switch could be found on the interface board, It has 2 features: | ||
| Line 264: | Line 269: | ||
''By Default this setting is turned off''<br> | ''By Default this setting is turned off''<br> | ||
== Automatic energy meter type search == | == Automatic energy meter type search == | ||
| Line 285: | Line 289: | ||
==Reboot device== | ==Reboot device== | ||
There is a possibility to reboot charger through the Teltonika Energy app. | There is a possibility to reboot charger through the Teltonika Energy app. | ||
==EV Sleep feature== | |||
„EV Sleep“ feature prevents the charger from repeatedly waking up and restarting when the electric vehicle does not actually begin charging. Some EVs (Electric Vehicles) trigger repeated B2 → D1 → B2 cycles, which can cause unnecessary start attempts. When enabled, this feature protects the charger from entering this loop. | |||
'''How the feature works''' <br> | |||
''When EV Sleep Mode is disabled (Default):'' <br> | |||
The charger behaves normally and does not block the repeated B2/D1 sequence.<br> | |||
If the EV stops charging and then requests the charger again, the EVSE will always try to restart charging.<br> | |||
Recommended for users who rely on DLM / Smart Charging and want continuous restart attempts.<br> | |||
<br> | |||
''When EV Sleep Mode is enabled:''<br> | |||
The charger starts tracking how many times it enters the sequence:<br> | |||
C (charging) → B2 (EV stopped) → D1 (waiting) → B2 → …<br> | |||
Each time this sequence occurs, a counter increases. If the sequence happens twice and the EV still does not start charging: | |||
<br> The charger stops trying to restart charging. | |||
<br> It stays in D1 (waiting) indefinitely. | |||
<br> It waits until the vehicle is physically disconnected. <br> | |||
The counter resets automatically when the EV successfully starts charging after this sequence. | |||
'''Who should enable this feature?''' <br> | |||
This mode is recommended if: <br> | |||
1. The user experiences repeated interrupted cycles (stop → wait → start attempt). <br> | |||
2. The user prefers that the charger does not attempt to start charging repeatedly until the EV is unplugged. | |||
[[Category: Product guides]] | [[Category: Product guides]] | ||
Latest revision as of 13:00, 20 April 2026
Main Page > TeltoCharge > Product guides > Functionalities EVC2NEW: Automatic grid type detection
Charger will automatically detect the following input options.
- Single phase
- Three phase
- Bi-phase No neutral
- Three phase No neutral
NEW: Physical power selector switch
- This switch could be found on the interface board.
- It could turned to to limit MAX device output. By changing rotary switch position it is possible to charge charger’s max output.
- By default (position 0) charger sets max possible output power depending on HW.
- Possible values differ between different modification devices.
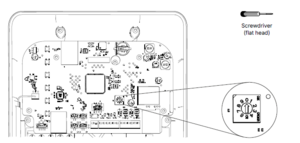

| Position | Current | Power 1phase | Power 3P | |
|---|---|---|---|---|
| Default | 0 | 32 A | 7,4 kW | 22kW |
| 1 | 6 A | 1,4 kW | 4,1 kW | |
| 2 | 10 A | 2,3 kW | 6,9 kW | |
| 3 | 13 A | 3 kW | 9 kW | |
| 4 | 16 A | 3,7 kW | 11 kW | |
| 5 | 20 A | 4,6 kW | 14 kW | |
| 6 | 25 A | 5,7 kW | 17 kW | |
| 7 | 28 A | 6,5 kW | 19 kW | |
| Reserved | 8 | N/A | N/A | N/A |
| Reserved | 9 | N/A | N/A | N/A |
NEW: IT grid support
Enable this setting if the charger is installed on an IT grid.
When turned on, the charging station adapts its voltage monitoring for IT grid operation, where voltage can be floating in relation to protective earth (PE).
NEW: Button switch
This switch could be found on the interface board, It has 2 features:
- If button is pressed for 1s charger will reboot.
- If button is pressed for 5s charger will restore user default settings.
NEW: Potential-free contact
 This is achieved by allowing user to configure it via APP
- It is possible to emergency stop charging when the circuit is opened or closed.
- It is possible to block or allow charging when the circuit is opened or closed.
- It is possible to reduce the charging rate when the circuit is opened or closed.
NEW: 2x RS-485 support
- Meter port will be used for load balance and MID meter.
- DLM port used only for load management.
- Dynamic Load Managment with MID meter for all of the secondary devices is possible

Cable lock
There is a possibility to activate cable lock on demand even if the charging is not initiated.
- When Cable lock is ON, the locking pin pushes out and fixes charging cable in place.
- When Cable lock is set to AUTO, locking pin behaves accordingly to the charging state the product is in.
- A state - Cable is not locked;
- B/C/D states - Cable is locked;
By default this status is set to AUTO
Settings can only be found in socket variant products
Authorization
There is possibility to turn ON/OFF authorization for TeltoCharge.
When authorization is ON, user have to authorize every time he wants to start charging process. Authorization can be done in two different ways:
- By swiping the Slider in main menu;
- By using NFC card;
By default authorization status is set to OFF, user can set this status during the first set-up wizard.
NFC
For personalized authorization, there is possibility to add and use NFC cards. Just press "Add new card", name your card and then touch the NFC card to the side of the charger. It should say "Card added successfully".
More information about NFC cards pairing can be found here.
By default, NFC cards whitelist is empty.
Load balancing
Inside load balancing menu user can lower or increase current up to the value which was set by the installer in Installer menu.
For example: you set 32 A in Installer menu option Max power from grid, so in user menu option Load balancing you will be able to set limitation from 6 A to 32 A.
By default load balancing is set to 10 A, user can increase this value when he increases Max power from grid option in Installer menu.
Schedule
There is an option to configure individual charging times in order to plan electricity usage or the effectiveness of the electrical grid.
- For the time periods when the car should not be charged, select the ‘Peak hours’ section.
- For time periods when the car should be charged, select the ‘Schedule‘ section (click on the + icon in the upper right corner).
To set charging schedules, choose the desired hours and minutes on the provided clock.
The ‘Repeat schedule‘ function repeats every week on the selected days.
When the ‘Repeat schedule‘ function is disabled, the selected charging schedule will be set only for the week ahead and will stop after the last set day. In this case, the ‘Enable schedule charging‘ function will be automatically disabled. If the ‘Start time‘ is set in the past, the schedule will be active on the next selected day of the week. For example, if the current time is 10 AM on Friday, but the ‘Start time‘ is scheduled for 9 AM on Friday, it will only be active on the following Friday at 9 AM.
The ‘Enable schedule charging‘ function will be disabled at midnight after the end of a schedule.
It is important to optimize the active schedules and ensure that they do not overlap. Charger will not allow to save active overlapping schedules. However, when schedules are disabled, it can be saved.
If peak hours are set for one time and scheduled charging hours are set later on the same day, there is a contradiction between these two conditions, and the EV will not be charged during the period between them. For example, if peak hours are set from 2 PM to 3 PM and regular scheduled charging hours are set from 5 PM to 7 PM, the EV will be charged only from 5 PM to 7 PM.
Randomized delay
The randomized delay function provides an additional layer of protection against grid overloading. In the following cases, a random delay of up to 10 minutes will be applied:
- When a vehicle is connected and attempting to initiate the charging process for the first time.
- At the beginning and end of each scheduled charging session.
- After TeltoCharge has been restarted, rebooted, or turned off.
Although this feature is enabled, it can be manually interrupted by swiping the App slider or using an NFC card.
Using the Randomized delay function along with scheduled charging hours, the EV will only begin charging after waiting for the scheduled time and adding a randomized delay of up to 10 minutes. Similarly, a randomized delay will be applied to the scheduled end of charging.
If the EV charging process is interrupted (e. g. temporary power outage), the randomized delay will still be in effect when the power is restored, further delaying the start of charging.
When OCPP is turned on, the Randomized delay functionality will not be active.
Errors and warnings
If TeltoCharge is not working correctly and giving errors or warnings, you will now be able to see more information in the app. All errors and warnings will be sent to the app in real-time. For all the details check: LED indicators list
Live data
Live data from TeltoCharge. It will be possible to see such data as:
- Charging type
- Phase used
- Temperature
- Max allowed current
- Phase voltages (input and output)
Connectivity
In the connectivity tab user can connect TeltoCharge to internet via Wi-Fi, Ethernet cable or GSM card (if it is selected as product option).
The product utilizes the local WebSocket service (used by the App over LAN).
In this section, it is also possible to connect charging station to internet server for remote management (OCPP).
Bluetooth
Product supports Bluetooth LE (BLE).
Bluetooth is always enabled by default.
WiFi
Product supports 2.4 GHz Wi-Fi connectivity.
By default this feature is disabled.
To connect Teltocharge to Wi-Fi, just follow these steps:
- Open Wi-Fi tab;
- Enable it with the slider;
- Select your network from provided list;
- Insert password and press save;
- Wait until product is connected successfully;
Mobile
Optional. About possible purchase ask your sales manager
To connect TeltoCharge to cellular data first of all nano SIM card have to be inserted to the SIM card port. After that just enable Mobile Internet in the Connectivity tab with the slider.
Mobile internet tab also has got some configurations which can be set by user:
- PIN code
- APN adress
- Username
- Password
- Dialing number
The product supports 4G/LTE (CAT1), 3G, 2G internet connection.
Mobile internet connection is disabled by default.
OCPP
Open Charge Point Protocol 1.6 is used to connect TeltoCharge to 3rd party Cloud servers. At the moment charger is able to achieve "Core", "Local auth list management" and "Smart charging" functions.
Before connecting TeltoCharge to any 3rd party Charge point management server, firstly check if server is compatible with OCPP 1.6 JSON.
If server provider supports this OCPP version, to connect, user needs to type in server URL address and Charge point identity. After all settings are set, enable OCPP with a slider and press Save at the bottom of the screen. User also can see status if charger was connected successfully or not.
More information about OCPP you can find here.
Ethernet
To connect TeltoCharge with Ethernet just plug in the cable and all needed settings should be set automatically.
In order to be able to type configuration manually, user have to disable DHCP setting beforehand. DHCP slider can be found in the same Ethernet parameters window.
Ethernet is enabled by default.
Date & Time
In this tab user can set date and time according to the region in which product is going to be used. It is recommended to synchronize time with phone (button for this action is provided).
Device info
In this tab user/installer can see all the HW information about charger, maximum current set by installer (inside installer menu) and real-time temperature.
Also there is a possibility to restore default settings. With this function TeltoCharge restore all settings to default values except from the Installer Menu ones.
After pressing Check for updates, new window pops up, where user/installer can see information about current FW and update it.
Diagnostics
Here you can download troubleshoot file.
It will be used only by the Customer support engineers while solving risen issues.
This is the menu for installer to reach configuration settings.
After every installation installer must open this menu and set required parameters.
To open installer menu, it is needed to insert Installer code. You can find this code on the sticker, which is placed on the middle plate (under the front plate).
*Installer menu is only for installers or personnel with relevant qualifications.*
Max power from grid
This configuration shall be used in two different ways:
- If you are using Dynamic load balancing, use this value to set the maximum current per phase that can be supplied to the whole electrical installation. Usually this value is the rated current of the main circuit breaker.
- If you are not using Dynamic load balancing, use this value to set maximum current, which charger can use. This value should be calculated according to the possible load, that other appliances can be using, by subtracting it from the maximal current which is provided to the grid. That said, in this situation, current should not be higher than 16 amperes (If 11 kW charger is installed) or 32 amperes ( if 7,4 or 22 kW chargers is installed).
By default this setting is set to 10 Amps
Supply voltage
- Installer can change supply voltage (voltage between phase and neutral wires)
- Different regions can have different supply voltages, so installer can set this value accordingly to the used voltage in the individual site;
Global product: By default this setting is set to 230 V
North American product: By default this setting is set to 120 V
Upper voltage tolerance
There is a possibility to change the tolerance limit for upper voltage threshold. This can be used in the sites where voltage fluctuation is recurring.
By default this setting is set to 10 %
Lower voltage tolerance
There is possibility to change the tolerance limit for lower voltage threshold. This can be used in the sites where voltage fluctuation is big.
By default this setting is set to 10 %
Three phase charging
With this slider installer have an ability to turn off 3-phase charging (only if 3 phases are connected to the product).
By default this setting is turned OFF
Not available in North America products
Phase priority
There is a possibility to select which phase should be prioritized for charging, if 3 phases are connected, but 3-phase charging is disconnected.
For example: if 3 chargers are connected to the same electrical network, it is possible to prioritize different phase for each charger to avoid cutting of the main power.
By default this setting is set to L1
Not available in North America products
Dynamic load balancing
This function is used to turn on Dynamic load balancing. To access this feature it is recommended to read more here
By Default this setting is turned off
Automatic energy meter type search
Be able to choose energy meter type, which will be used for the load balancing. Meter type setting is available in the app and the setting has two options: 1 phase, 3 phase
MID meter
Option to use data from external energy meter for power consumption calculations. New setting in the app for activating this function. Total values from energy meter also will be used in the OCPP. When this function is activated, dynamic load balancing function will not be active.
Temperature warning
There is a possibility to increase temperature warning level. When charger reaches this temperature level, it starts to ventilate itself by decreasing charging power. If Charger reaches 80°C it turns off relays and stops charging process.
By default this setting is set to 60 °C
Factory default settings
By using this setting installer can restore Factory default settings. This function restores all settings which were set in the Installer menu as well as in the Main menu.
After this reset yellow LEDs starts blinking which means that charger requires to set-up Installer menu again.
Reboot device
There is a possibility to reboot charger through the Teltonika Energy app.
EV Sleep feature
„EV Sleep“ feature prevents the charger from repeatedly waking up and restarting when the electric vehicle does not actually begin charging. Some EVs (Electric Vehicles) trigger repeated B2 → D1 → B2 cycles, which can cause unnecessary start attempts. When enabled, this feature protects the charger from entering this loop.
How the feature works
When EV Sleep Mode is disabled (Default):
The charger behaves normally and does not block the repeated B2/D1 sequence.
If the EV stops charging and then requests the charger again, the EVSE will always try to restart charging.
Recommended for users who rely on DLM / Smart Charging and want continuous restart attempts.
When EV Sleep Mode is enabled:
The charger starts tracking how many times it enters the sequence:
C (charging) → B2 (EV stopped) → D1 (waiting) → B2 → …
Each time this sequence occurs, a counter increases. If the sequence happens twice and the EV still does not start charging:
The charger stops trying to restart charging.
It stays in D1 (waiting) indefinitely.
It waits until the vehicle is physically disconnected.
The counter resets automatically when the EV successfully starts charging after this sequence.
Who should enable this feature?
This mode is recommended if:
1. The user experiences repeated interrupted cycles (stop → wait → start attempt).
2. The user prefers that the charger does not attempt to start charging repeatedly until the EV is unplugged.