Difference between revisions of "EM and ET models"
From Wiki
| (9 intermediate revisions by the same user not shown) | |||
| Line 15: | Line 15: | ||
| style="padding: 2px;" rowspan="4" | EM111 <br> | | style="padding: 2px;" rowspan="4" | EM111 <br> | ||
| style="padding: 1px;" | 120 V | | style="padding: 1px;" | 120 V | ||
| − | | colspan="2" style="padding: 2px;" | [https://wiki.teltonika-energy.com/images/ | + | | colspan="2" style="padding: 2px;" |[https://wiki.teltonika-energy.com/images/7/71/EM111_Solar.PNG EM111-DIN AV7 1 X S1 PF B] |
| style="padding: 1px;" | + | | style="padding: 1px;" | + | ||
| rowspan="10" style="padding: 2px;" | 1 phase <br> | | rowspan="10" style="padding: 2px;" | 1 phase <br> | ||
| Line 22: | Line 22: | ||
|- | |- | ||
| style="padding: 2px;" | 230 V | | style="padding: 2px;" | 230 V | ||
| − | | colspan="2" style="padding: 1px;" | [https://wiki.teltonika-energy.com/images/ | + | | colspan="2" style="padding: 1px;" |[https://wiki.teltonika-energy.com/images/7/71/EM111_Solar.PNG EM111-DIN AV8 1 X S1 PF B] |
| style="padding: 1px;" | + | | style="padding: 1px;" | + | ||
|- | |- | ||
| Line 35: | Line 35: | ||
| rowspan="4" |EM112 | | rowspan="4" |EM112 | ||
|120 V | |120 V | ||
| − | | | + | | colspan="2" style="padding: 2px;" |[https://wiki.teltonika-energy.com/images/b/b2/EM112_Solar.PNG EM112-DIN AV1 1 X S1 PF B] |
| − | | | ||
| + | | + | ||
| − | | rowspan="4" | | + | | rowspan="4" style="padding: 2px;" | [https://www.gavazzionline.com/pdf/EM112DS.pdf EM112] |
|- | |- | ||
|230 V | |230 V | ||
| − | | | + | | colspan="2" style="padding: 2px;" |[https://wiki.teltonika-energy.com/images/b/b2/EM112_Solar.PNG EM112-DIN AV0 1 X S1 PF B] |
| − | | | ||
| + | | + | ||
|- | |- | ||
|120 V | |120 V | ||
| − | | | + | | colspan="2" style="padding: 2px;" | [https://wiki.teltonika-energy.com/images/8/81/EM112_Standard.PNG EM112-DIN AV1 1 X S1 X] |
| − | | | ||
| - | | - | ||
|- | |- | ||
|230 V | |230 V | ||
| − | | | + | | colspan="2" style="padding: 2px;" | [https://wiki.teltonika-energy.com/images/8/81/EM112_Standard.PNG EM112-DIN AV0 1 X S1 X] |
| − | | | ||
| - | | - | ||
|- | |- | ||
| Line 83: | Line 79: | ||
| style="padding: 2px;" rowspan="2" | EM340 <br> | | style="padding: 2px;" rowspan="2" | EM340 <br> | ||
| style="padding: 1px;" | 400 V | | style="padding: 1px;" | 400 V | ||
| − | | style="padding: 1px;" | [https://wiki.teltonika-energy.com/images/ | + | | colspan="2" style="padding: 1px;" |[https://wiki.teltonika-energy.com/images/f/f8/EM340_Solar.PNG EM340-DIN AV2 3 X S1 PFB] |
| − | |||
| style="padding: 1px;" | + | | style="padding: 1px;" | + | ||
| style="padding: 2px;" rowspan="2" | [https://www.gavazzi.no/wp-content/uploads/EM340_DS_ENG.pdf EM340] | | style="padding: 2px;" rowspan="2" | [https://www.gavazzi.no/wp-content/uploads/EM340_DS_ENG.pdf EM340] | ||
|- | |- | ||
| style="padding: 1px;" | 400 V | | style="padding: 1px;" | 400 V | ||
| − | | style="padding: 1px;" | [https://wiki.teltonika-energy.com/images/archive/a/a6/20230306130731%21EM340.PNG EM340-DIN AV2 3 X S1 X] | + | | colspan="2" style="padding: 1px;" | [https://wiki.teltonika-energy.com/images/archive/a/a6/20230306130731%21EM340.PNG EM340-DIN AV2 3 X S1 X] |
| − | |||
| style="padding: 1px;" | - | | style="padding: 1px;" | - | ||
|- | |- | ||
| Line 118: | Line 112: | ||
| style="padding: 2px;" | EM530 | | style="padding: 2px;" | EM530 | ||
| style="padding: 2px;" | 400 V | | style="padding: 2px;" | 400 V | ||
| − | | style="padding: 2px;" | | + | | style="padding: 2px;" | Yes |
| − | | style="padding: 2px;" | | + | | style="padding: 2px;" | Yes |
| style="padding: 1px;" | + | | style="padding: 1px;" | + | ||
| style="padding: 2px;" rowspan="2" | 3 phase | | style="padding: 2px;" rowspan="2" | 3 phase | ||
| Line 126: | Line 120: | ||
| style="padding: 2px;" | EM540 | | style="padding: 2px;" | EM540 | ||
| style="padding: 2px;" | 400 V | | style="padding: 2px;" | 400 V | ||
| − | | style="padding: 2px;" | | + | | style="padding: 2px;" | Yes |
| − | | style="padding: 2px;" | | + | | style="padding: 2px;" | Yes |
| style="padding: 1px;" | + | | style="padding: 1px;" | + | ||
| style="padding: 2px;" | [https://www.gavazzionline.com/pdf/EM540_DS_ENG.pdf EM540] | | style="padding: 2px;" | [https://www.gavazzionline.com/pdf/EM540_DS_ENG.pdf EM540] | ||
| Line 133: | Line 127: | ||
'''''*DLB''' - Dynamic load balancing'' | '''''*DLB''' - Dynamic load balancing'' | ||
| − | |||
| − | |||
==== Carlo Gavazzi meters wiring: ==== | ==== Carlo Gavazzi meters wiring: ==== | ||
Latest revision as of 13:12, 5 June 2024
Carlo Gavazzi smart energy meters technical information
| Energy meter manufacturer | Type | Power supply (V) | Supported model for DLB* | Supported model for Solar | MID certified | 1/3 phase | Datasheet |
|---|---|---|---|---|---|---|---|
| Carlo Gavazzi series 1 | EM111 |
120 V | EM111-DIN AV7 1 X S1 PF B | + | 1 phase |
EM111 | |
| 230 V | EM111-DIN AV8 1 X S1 PF B | + | |||||
| 120 V | EM111-DIN AV7 1 X S1 X | - | |||||
| 230 V | EM111-DIN AV8 1 X S1 X | - | |||||
| EM112 | 120 V | EM112-DIN AV1 1 X S1 PF B | + | EM112 | |||
| 230 V | EM112-DIN AV0 1 X S1 PF B | + | |||||
| 120 V | EM112-DIN AV1 1 X S1 X | - | |||||
| 230 V | EM112-DIN AV0 1 X S1 X | - | |||||
| ET112 |
120 V | ET112-DIN AV1 1 X S1 X | - | ET112 | |||
| 230 V | ET112-DIN AV0 1 X S1 X | - | |||||
| Carlo Gavazzi series 3 | EM330 |
400 V | EM330-DIN AV5 3 H S1 PF A/B | + | 3 phase | EM330 | |
| 400 V | EM330-DIN AV5 3 H S1 X | - | |||||
| EM340 |
400 V | EM340-DIN AV2 3 X S1 PFB | + | EM340 | |||
| 400 V | EM340-DIN AV2 3 X S1 X | - | |||||
| ET330 |
230 V | ET330-DIN AV5 3 H S1 X | - | 1 phase | ET330 | ||
| 400 V | ET330-DIN AV5 3 H S1 X | - | 3 phase | ||||
| ET340 | 400 V | ET340-DIN AV2 3 X S1 X | - | ET340 | |||
| Carlo Gavazzi series 5 | EM530 | 400 V | Yes | Yes | + | 3 phase | EM530 |
| EM540 | 400 V | Yes | Yes | + | EM540 | ||
*DLB - Dynamic load balancing
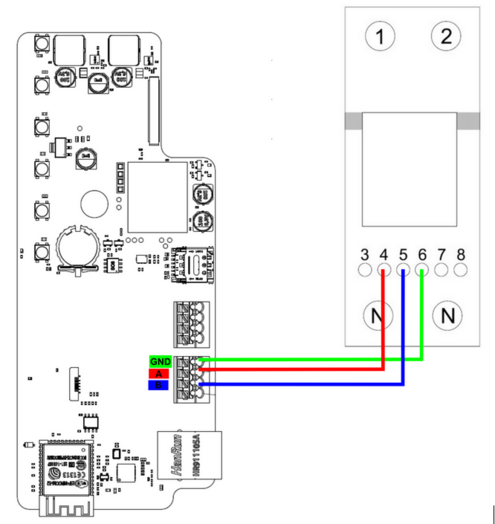
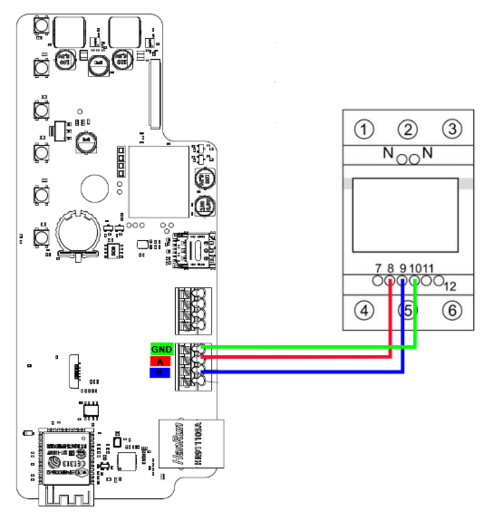
Carlo Gavazzi meters wiring:
Note 1: All of the Color-coding is strictly exemplary and is used simply to differentiate between different connection points. Different communication cables can have differently coloured wires. Connect them according to used inventory.
Note 2: Ensure that the power is off before proceeding with the wiring
1st series to TeltoCharge connection
3rd and 5th series to TeltoCharge connection
Powering the energy meter
To correctly connect smart energy meter to power source, it is recommended to use manufacturers installation manuals.

