Difference between revisions of "Closing the front plate"
From Wiki
(Created page with "=== Closing the middle panel === border|frameless|512x512px '''A''' - Place a middle panel on the...") |
|||
| (One intermediate revision by the same user not shown) | |||
| Line 1: | Line 1: | ||
| − | === Closing the | + | === Closing the front plate; === |
| − | [[File:TeltoCharge Installation InstallationProcess | + | [[File:TeltoCharge Installation InstallationProcess ClosingFrontPanel.PNG|border|frameless|473x473px]] |
| − | ''' | + | '''Untethered version''' |
| − | '''B''' - Fix it using DIN912 M3x8 screws; | + | '''A''' - Open up bottom part and insert the upper part of the front plate to the fixing holes and fix the plate; |
| + | |||
| + | '''B''' - Fix it using DIN912 M3x8 screws; | ||
| + | |||
| + | '''Tethered version''' | ||
| + | |||
| + | '''C''' - Lock the top of the plate; | ||
| + | |||
| + | '''D''' - Lock the bottom of the plate; | ||
| + | |||
| + | '''E''' - Fix it using DIN912 M3x8 screws; | ||
← [https://wiki.teltonika-energy.com/index.php?title=Physical_installation&action=edit&redlink=1 BACK TO PHYSICAL INSTALLATION PAGE] | ← [https://wiki.teltonika-energy.com/index.php?title=Physical_installation&action=edit&redlink=1 BACK TO PHYSICAL INSTALLATION PAGE] | ||
Latest revision as of 18:00, 7 February 2023
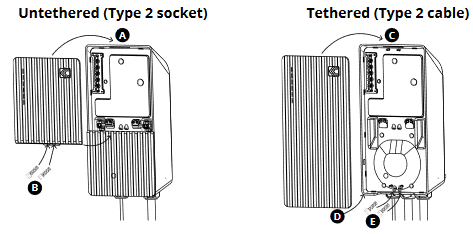
Closing the front plate;
Untethered version
A - Open up bottom part and insert the upper part of the front plate to the fixing holes and fix the plate;
B - Fix it using DIN912 M3x8 screws;
Tethered version
C - Lock the top of the plate;
D - Lock the bottom of the plate;
E - Fix it using DIN912 M3x8 screws;
