
ABB settings: Difference between revisions
No edit summary |
No edit summary |
||
| (One intermediate revision by the same user not shown) | |||
| Line 1: | Line 1: | ||
<div style="font-family:'Inter','Helvetica Neue',Arial,sans-serif; line-height:1.6;"> | |||
= | |||
'' | |||
{| class="wikitable" style="text-align: center; border: | == <span style="font-family:'Oswald','Arial Narrow',sans-serif; text-transform:uppercase; letter-spacing:0.02em;">RS-485 parameters for ABB A41, A42, A43, A44, B21, B23 and B24</span> == | ||
''Note: The energy meter's parameters must match the EVSE (charger) parameters. The default values are listed below.'' | |||
! style="background | |||
{| class="wikitable" style="text-align:center; width:80%;" | |||
! style="background:#001A77; color:#FFFFFF; border-color:#001A77; font-family:'Oswald','Arial Narrow',sans-serif; text-transform:uppercase; letter-spacing:0.03em; font-weight:500; padding:8px;" | RS-485 parameter | |||
! style="background:#001A77; color:#FFFFFF; border-color:#001A77; font-family:'Oswald','Arial Narrow',sans-serif; text-transform:uppercase; letter-spacing:0.03em; font-weight:500; padding:8px;" | EVSE (charger) default value (configurable in the app) | |||
|- | |- | ||
| Modbus address || 1 | |||
| | |||
|- | |- | ||
| Baud rate || 9600 | |||
| | |||
|- | |- | ||
| Parity || Even | |||
| | |||
|- | |- | ||
| Stop bits || 1 | |||
| | |||
|} | |} | ||
== <span style="font-family:'Oswald','Arial Narrow',sans-serif; text-transform:uppercase; letter-spacing:0.02em;">Configuring the meter in the mobile application</span> == | |||
''Note: You can use two meters with different addresses. Both meters share the same settings in the installer menu.'' | |||
''Note 2: When connecting an ABB B23 energy meter, it is recommended to swap the A and B wires (A goes to B, B goes to A).'' | |||
# Make sure your charger firmware and application are updated to the latest version (see [[Release notes: Firmware]] and the app for [https://apps.apple.com/lt/app/teltonika-energy/id1618750750 iOS] / [https://play.google.com/store/apps/details?id=com.teltonika.ems.ev&hl=en&gl=US Android]). | |||
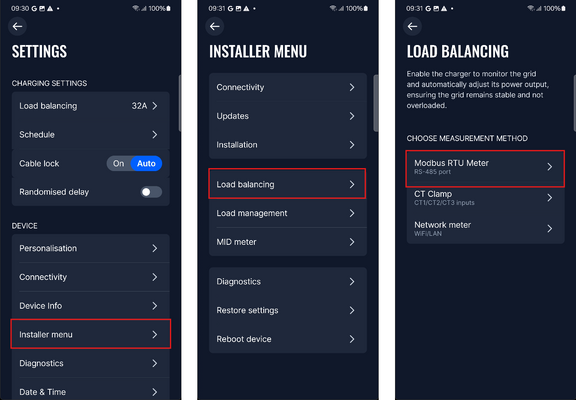
# Enter the Installer menu, select Load Balancing, then Modbus RTU.<br>[[File:Settings-to-rtu.png|frameless|alt=Path to Modbus RTU settings|576x576px]] | |||
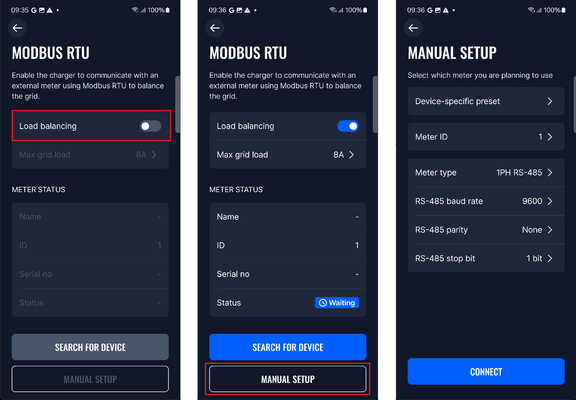
# If the charger does not recognise the meter, go to Manual Setup and choose your meter model from the presets, or enter the values from the RS-485 parameters table manually.<br>[[File:Mod-to-manual.png|frameless|alt=Manual setup screen|576x576px]] | |||
Once the meter is successfully configured, press Connect. You will receive a confirmation screen and the status will change. Possible statuses: | |||
* '''Connected''' – the meter is configured correctly. | |||
* '''Disconnected''' – a wrong parameter value is set on the charger, or the meter is not wired correctly. | |||
* '''Wrong type''' – the meter configuration does not match the connected meter. | |||
* '''Not supported''' – the connected meter is not compatible with the installation. | |||
For detailed settings, refer to the energy meter's official documentation. | |||
</div> | |||
[[Category:Smart energy meter mastersheet]] | |||
Latest revision as of 13:50, 28 October 2026
Main Page > Main Page EVC2 > Smart energy meter mastersheet > ABB settingsRS-485 parameters for ABB A41, A42, A43, A44, B21, B23 and B24
Note: The energy meter's parameters must match the EVSE (charger) parameters. The default values are listed below.
| RS-485 parameter | EVSE (charger) default value (configurable in the app) |
|---|---|
| Modbus address | 1 |
| Baud rate | 9600 |
| Parity | Even |
| Stop bits | 1 |
Configuring the meter in the mobile application
Note: You can use two meters with different addresses. Both meters share the same settings in the installer menu.
Note 2: When connecting an ABB B23 energy meter, it is recommended to swap the A and B wires (A goes to B, B goes to A).
- Make sure your charger firmware and application are updated to the latest version (see Release notes: Firmware and the app for iOS / Android).
- Enter the Installer menu, select Load Balancing, then Modbus RTU.
- If the charger does not recognise the meter, go to Manual Setup and choose your meter model from the presets, or enter the values from the RS-485 parameters table manually.


Once the meter is successfully configured, press Connect. You will receive a confirmation screen and the status will change. Possible statuses:
- Connected – the meter is configured correctly.
- Disconnected – a wrong parameter value is set on the charger, or the meter is not wired correctly.
- Wrong type – the meter configuration does not match the connected meter.
- Not supported – the connected meter is not compatible with the installation.
For detailed settings, refer to the energy meter's official documentation.