Difference between revisions of "LED indicators"
m |
|||
| (34 intermediate revisions by 4 users not shown) | |||
| Line 1: | Line 1: | ||
| + | __TOC__ | ||
| + | <h2 style="color: #4a4a4a; font-size: 24px; font-weight: bold; margin-bottom: 10px;">Introduction</h2> | ||
| + | <ul style="list-style-type: none; margin: 0; padding: 0;"> | ||
| + | Here you can find information about '''LED indicators''' of TeltoCharge and also '''Warnings''' which you could see inside your mobile application. There is explanation and solution provided for all of them. | ||
| + | <br> | ||
| + | <h2 style="color: #4a4a4a; font-size: 24px; font-weight: bold; margin-bottom: 10px;">How to check your charger firmware version?</h2> | ||
| + | <ul style="list-style-type: none; margin: 0; padding: 0;"> | ||
| + | <br> | ||
| + | 1. Go to Teltonika Energy app settings, scroll down and press '''device info''; <br> | ||
| + | 2. Press Check for updates; <br> | ||
| + | |||
| + | 3. At the top, current firmware version can be found. <br> | ||
| + | <br> | ||
| + | [[File:TeltoCharge FirmwareVersionCheck.png|frameless|588x588px]] [[File:TeltoCharge FirmwareVersionCheck1.png|frameless|588x588px]] | ||
| + | <br> | ||
| + | <h2 style="color: #4a4a4a; font-size: 24px; font-weight: bold; margin-bottom: 10px;">How to download troubleshoot file?</h2> | ||
| + | <ul style="list-style-type: none; margin: 0; padding: 0;"> | ||
| + | Simple steps of finding place in your mobile application where you can download '''troubleshoot file'''. | ||
| + | <br> | ||
| + | 1. Go to '''Settings'''->'''Device info'''->'''Diagnostics'''. <br> | ||
| + | 2. Slide to the bottom. <br> | ||
| + | 3. Click '''Download troubleshoot file'''. <br> | ||
| + | 4. '''''Wait up to 20 s''' for troubleshoot file to be generated.'' <br> | ||
| + | 5. Save file to your mobile phone and provide it to our Technical support departament. | ||
| + | <br> | ||
| + | <br> | ||
| + | [[File:Settings device info.PNG|frameless|400x400px]] [[File:Device info.PNG|frameless|400x400px]] [[File:TS download.PNG|frameless|400x400px]] [[File:TS waiting.PNG|frameless|400x400px]] | ||
| + | |||
| + | <h2 style="color: #4a4a4a; font-size: 24px; font-weight: bold; margin-bottom: 10px;">LED indicators</h2> | ||
| + | <ul style="list-style-type: none; margin: 0; padding: 0;"> | ||
| + | ===STATUS INDICATIONS=== | ||
{| class="wikitable" | {| class="wikitable" | ||
|+ | |+ | ||
| Line 10: | Line 41: | ||
!G | !G | ||
!H | !H | ||
| − | + | ||
| − | |||
| − | |||
|- | |- | ||
|[[File:TeltoCharge LEDS booting up.gif|center|frameless]] | |[[File:TeltoCharge LEDS booting up.gif|center|frameless]] | ||
| + | |[[File:White rolldown.gif|center|frameless|alt=|213x213px]] | ||
|[[File:TeltoCharge LEDS Standby White.gif|center|frameless]] | |[[File:TeltoCharge LEDS Standby White.gif|center|frameless]] | ||
|[[File:TeltoCharge LEDS Standby Yellow.gif|center|frameless]] | |[[File:TeltoCharge LEDS Standby Yellow.gif|center|frameless]] | ||
| Line 20: | Line 50: | ||
|[[File:TeltoCharge LEDS WaitingforEV.gif|center|frameless]] | |[[File:TeltoCharge LEDS WaitingforEV.gif|center|frameless]] | ||
|[[File:TeltoCharge LED WaitingforAuthorization.gif|center|frameless]] | |[[File:TeltoCharge LED WaitingforAuthorization.gif|center|frameless]] | ||
| − | |[[File:TeltoCharge LEDS | + | |[[File:TeltoCharge LEDS OnHold.gif|center|frameless|alt=|202x202px]] |
| − | + | ||
| − | | | ||
| − | |||
| − | |||
|- | |- | ||
|White LED‘s rolling from the bottom to the top – shows that TeltoCharge is booting up | |White LED‘s rolling from the bottom to the top – shows that TeltoCharge is booting up | ||
| + | |White LED‘s rolling from the top to the bottom – shows that TeltoCharge is Reserved (OCPP only) | ||
|White pulsing LED‘s – shows that TeltoCharge is in standby mode and waiting for action | |White pulsing LED‘s – shows that TeltoCharge is in standby mode and waiting for action | ||
|Yellow pulsing LED‘s – shows that TeltoCharge is in standby mode with default settings. | |Yellow pulsing LED‘s – shows that TeltoCharge is in standby mode with default settings. | ||
| Line 32: | Line 60: | ||
|Blue LED‘s lights up from the middle – TeltoCharge do not require permission, it is waiting for EV to initiate charging process (go to state C). | |Blue LED‘s lights up from the middle – TeltoCharge do not require permission, it is waiting for EV to initiate charging process (go to state C). | ||
|Blue LED‘s pulsing – permission to charge is not granted. TeltoCharge requires authorization. | |Blue LED‘s pulsing – permission to charge is not granted. TeltoCharge requires authorization. | ||
| − | | | + | |Blue LED‘s rolldown from up to down |
| − | + | 1. Wait for scheduled time.<br> | |
| − | + | 2. No dynamic power – DLB/DLM/Solar enabled and no sufficient power.<br> | |
| − | + | 3. EVSE suspended.<br> | |
| − | + | 4. Reserved charge (OCPP only). | |
| + | |||
|- | |- | ||
| + | | | ||
| | | | ||
| | | | ||
| Line 44: | Line 74: | ||
| | | | ||
|Authorize yourself with app or NFC card. | |Authorize yourself with app or NFC card. | ||
| + | |1. Go to settings via Teltonika energy APP and select schedule time section to check for set graphs<br> | ||
| + | 2. Wait for more available power or increase amperage limits via settings (if your grid allows it)<br> | ||
| + | 3. Available power is less than 6 Amperes. Provide more power or wait for more to generate.<br> | ||
| + | 4. Other user has already reserved this charging station or RemoteStartTransaction command was received (OCPP only) | ||
| + | |||
| + | |} | ||
| + | |||
| + | {| class="wikitable" | ||
| + | |+ | ||
| + | !I | ||
| + | !J | ||
| + | !K | ||
| + | !L | ||
| + | !M | ||
| + | !N | ||
| + | ! O | ||
| + | |- | ||
| + | |[[File:TeltoCharge LEDS AddNFC.gif|center|frameless]] | ||
| + | |[[File:TeltoCharge LEDS InitialisationOfCharging.gif|center|frameless]] | ||
| + | |[[File:TeltoCharge LEDS Charging.gif|center|frameless]] | ||
| + | |[[File:TeltoCharge LED ChargingFinished.png|center|frameless]] | ||
| + | |[[File:TeltoCharge LEDS RequireVentilation.png|center|frameless]] | ||
| + | |[[File:TeltoCharge LEDS AuthorizationDeclined.png|center|frameless|alt=|204x204px]] | ||
| + | |[[File:TeltoCharge LEDS AuthorizationAccepted.PNG|center|frameless|alt=|204x204px]] | ||
| + | |- | ||
| + | |Four middle blue LED’s pulsing – TeltoCharge waiting to add new NFC card | ||
| + | |Green LED‘s pulsing - Initialisation of charging. | ||
| + | |Green LED‘s rolling upwards from the bottom – TeltoCharge is in charging process. | ||
| + | |Green LED‘s on – TeltoCharge finished charging. | ||
| + | |Purple LED‘s on – TeltoCharge requires ventilation (charging is done in state D). | ||
| + | |Red four middle LED's - NFC/RFID card declined from the server. | ||
| + | |Green four middle LED's - NFC/RFID card accepted from the server. | ||
| + | |- | ||
| | | | ||
| | | | ||
| Line 49: | Line 112: | ||
| | | | ||
|Open installer menu via Teltonika Energy app and select that charging location is ventilated. To select that charger must be installed in ventilated location. | |Open installer menu via Teltonika Energy app and select that charging location is ventilated. To select that charger must be installed in ventilated location. | ||
| + | |Check if NFC/RFID card is in a server cards whitelist. | ||
| + | | | ||
|} | |} | ||
| − | ===RED LED | + | |
| + | ===RED LED INDICATIONS (errors)=== | ||
{| class="wikitable" | {| class="wikitable" | ||
|+ | |+ | ||
| Line 61: | Line 127: | ||
!F | !F | ||
!G | !G | ||
| + | !H | ||
|- | |- | ||
|[[File:TeltoCharge LEDS InputVoltageError.png|center|frameless]] | |[[File:TeltoCharge LEDS InputVoltageError.png|center|frameless]] | ||
| Line 69: | Line 136: | ||
|[[File:TeltoCharge LEDS OtherErrors.png|center|frameless]] | |[[File:TeltoCharge LEDS OtherErrors.png|center|frameless]] | ||
|[[File:TeltoCharge LEDS FaultyConnection.gif|center|frameless]] | |[[File:TeltoCharge LEDS FaultyConnection.gif|center|frameless]] | ||
| + | |[[File:Orange_LED_warning_LED.png|center|frameless|alt=|202x202px]] | ||
|- | |- | ||
| − | |Input voltage error | + | |Input voltage error. |
| − | |Output voltage/current error | + | |Output voltage/current error. |
| − | |Current leakage detected | + | |Current leakage detected. |
| − | |Connectivity error | + | |Connectivity error. |
| − | |Temperature error | + | |Temperature error. |
| − | |Internal errors | + | |Internal errors. |
| − | |Faulty connection to EV | + | |Faulty connection to EV. |
| + | |Warning orange LED | ||
|- | |- | ||
|Overvoltage; | |Overvoltage; | ||
Undervoltage; | Undervoltage; | ||
| − | Wrong wiring | + | Wrong wiring. |
|Overvoltage; | |Overvoltage; | ||
Undervoltage; | Undervoltage; | ||
| − | Output current | + | Output current. |
|Current leakage detected | |Current leakage detected | ||
|Cable lock; | |Cable lock; | ||
PP fail; | PP fail; | ||
| − | Car diode | + | Car diode. |
| − | |Temperature reached | + | |Temperature reached 85°C |
| − | | -12V | + | | -12V; |
| − | |||
| − | |||
| − | |||
|CP fail | |CP fail | ||
| + | | | ||
| + | Problems with energy meter: | ||
| + | *Unrecognized; | ||
| + | *Badly set; | ||
| + | *Communication problems; | ||
| + | Other problems: | ||
| + | *Temperature; | ||
| + | *Current ; | ||
| + | *D state. | ||
|- | |- | ||
| − | | colspan=" | + | | colspan="8" |<center><big>Troubleshooting</big></center> |
|- | |- | ||
| | | | ||
| Line 105: | Line 180: | ||
*Check installer menu settings if supply voltage and voltage tolerance is in accordance with the measured input voltage. | *Check installer menu settings if supply voltage and voltage tolerance is in accordance with the measured input voltage. | ||
| | | | ||
| − | * Disconnect charging cable from the EV and check if the issue remains. | + | *Disconnect charging cable from the EV and check if the issue remains. |
| − | * Reboot charger and try to connect EV again. | + | *Reboot charger and try to connect EV again. |
| | | | ||
| − | * Disconnect the cable from the EV and check if the error persists. | + | *Disconnect the cable from the EV and check if the error persists. |
* If the error is cleared, try to start charging. If the error occurs once again, try following steps: | * If the error is cleared, try to start charging. If the error occurs once again, try following steps: | ||
| − | * Check if charging cable is fully pluged into socket and/or EV; | + | *Check if charging cable is fully pluged into socket and/or EV; |
| − | * Check if the inside of both the socket and the plug has no foreign materials inside (is clean). | + | *Check if the inside of both the socket and the plug has no foreign materials inside (is clean). |
| − | * Check visually if the cable is not damaged. | + | *Check visually if the cable is not damaged. |
* Check if the boards are not covered in dust and/or other materials. | * Check if the boards are not covered in dust and/or other materials. | ||
| | | | ||
| − | * Check if the charging cable is connected correctly from the charger side (socket version) and from the EV side; | + | *Check if the charging cable is connected correctly from the charger side (socket version) and from the EV side; |
* Try to reconnect charging cable to the EV and EVSE (if it is socket version). | * Try to reconnect charging cable to the EV and EVSE (if it is socket version). | ||
| − | * Listen if you can hear a clicking sound from the TeltoCharge when you plug the cable to EV. Charger should lock cable plug. If you can’t hear, try to unplug cable (from EVSE side) while it is plugged from EV side. If it is possible to unplug, report this problem via VIP helpdesk or your sales manager. | + | *Listen if you can hear a clicking sound from the TeltoCharge when you plug the cable to EV. Charger should lock cable plug. If you can’t hear, try to unplug cable (from EVSE side) while it is plugged from EV side. If it is possible to unplug, report this problem via VIP helpdesk or your sales manager. |
| − | * If any of these steps helps, measure the voltage between PE and PP and check if it is in accordance to the standard. | + | *If any of these steps helps, measure the voltage between PE and PP and check if it is in accordance to the standard. |
| | | | ||
| − | * Check the temperature inside Teltonika Energy app > Device info. If temperature is higher than | + | *Check the temperature inside Teltonika Energy app > Device info. If temperature is higher than 85 ℃ wait while charger cools down. |
| + | | | ||
| + | *Restart TeltoCharge | ||
| + | | | ||
| + | *Try reconnect charging cable from the EV side. There might be control pilot communication problem which can occur with different EV models. | ||
| + | |Go to the live data section and see what is the main problem. | ||
| + | |||
| + | *Check connected wires via TeltoCharge and energy meter inputs; | ||
| + | * Check if the energy meter is compatible; | ||
| + | *Check temperature. | ||
| + | |||
| + | |- | ||
| + | | colspan="8" |<center><big>If issues still persists, report it via VIP helpdesk or your sales manager. ('''Note:''' please provide as much information as you can about your issue (photos, videos, etc..) this helps to solve it faster.</big></center> | ||
| + | |} | ||
| + | |||
| + | ===WARNINGS=== | ||
| + | |||
| + | {| class="wikitable" | ||
| + | |+ | ||
| + | |- | ||
| + | | colspan="13" |<center><big>'''Warning message'''</big></center> | ||
| + | |- | ||
| + | |Simple CP detected | ||
| + | | Temperature warning | ||
| + | |Ventilation required | ||
| + | |RTC time lost | ||
| + | |Simplified CP denied | ||
| + | |D state denied | ||
| + | |Sensors not calibrated | ||
| + | |Energy meter comm error | ||
| + | |NFC init error | ||
| + | |Low battery voltage | ||
| + | |Emeter wrong type | ||
| + | |E-meter unidetified | ||
| + | |Main Board boot fail | ||
| + | |- | ||
| + | |- | ||
| + | | colspan="13" |<center><big>'''Meaning'''</big></center> | ||
| + | |- | ||
| + | | Connected EV uses Simplified charging sequence. Charging power is limited to1 Phase 10 A; | ||
| + | |||
| + | |Temperature higher than warning limit, current throttling | ||
| + | is present. | ||
| + | |||
| + | |EV requiring ventilation | ||
| + | |EVSE date and time lost | ||
| + | |Simplified CP detected and not allowed | ||
| + | |EV requiring ventilation but charging location is not ventilated | ||
| + | |Sensors were not calibrated during HW configuration | ||
| + | |Energy meter communication error | ||
| + | |NFC initialization error | ||
| + | |Low battery voltage EVSE (RTC) | ||
| + | |Energy meter configuration mismatch | ||
| + | | Energy meter type unidentified | ||
| + | |Main board is failing to boot | ||
| + | |||
| + | |- | ||
| + | | colspan="13" |<center><big>'''What to do to avoid'''</big></center> | ||
| + | |- | ||
| + | | | ||
| + | Connected EV uses Simplified charging sequence. Charging power is limited. In installer menu option „Simplified charging sequence“ must be turned ON. | ||
| + | | | ||
| + | |||
| + | | | ||
| + | Check if Charging location is sufficiently ventilated | ||
| + | | | ||
| + | Check EVSE RTC coin battery (CR 1220) | ||
| | | | ||
| − | + | Connected EV uses Simplified charging sequence. Simplified CP charging is disabled in Installer menu. | |
| | | | ||
| − | + | EV requiring ventilation, but Charging location is specified as not ventilated in Installer menu. | |
| + | | | ||
| + | Contact support. | ||
| + | | | ||
| + | Check RS485 connection with external meter. Inspect cable. Check if meter is working. Make sure devices are configutated properly. | ||
| + | | | ||
| + | Reboot charger and check if the issue remains. | ||
| + | | | ||
| + | Check EVSE RTC coin battery (CR 1220). | ||
| + | | | ||
| + | Connected Energy meter and configured Energy meter type in Installer menu are different. | ||
| + | | | ||
| + | Unknown device detected. Check if the energy meter is compatible. | ||
| + | | | ||
| + | Reboot charger and check if the issue remains - contact support. | ||
| + | |- | ||
| + | | colspan="13" |<center><big>This LED shows that there is an active warning in the charger. This warning indication will work with other indications. If issues still persists, report it via VIP helpdesk or your sales manager. ('''Note:''' please provide as much information as you can about your issue (photos, videos, etc..) this helps to solve it faster.</big></center> | ||
|- | |- | ||
| − | |||
|} | |} | ||
| − | |||
Latest revision as of 12:20, 11 October 2023
Introduction
-
Here you can find information about LED indicators of TeltoCharge and also Warnings which you could see inside your mobile application. There is explanation and solution provided for all of them.
- Unrecognized;
- Badly set;
- Communication problems;
- Temperature;
- Current ;
- D state.
- Check if input wiring is connected correctly;
- Measure input voltage;
- Check installer menu settings if supply voltage and voltage tolerance is in accordance with the measured input voltage.
- Disconnect charging cable from the EV and check if the issue remains.
- Reboot charger and try to connect EV again.
- Disconnect the cable from the EV and check if the error persists.
- If the error is cleared, try to start charging. If the error occurs once again, try following steps:
- Check if charging cable is fully pluged into socket and/or EV;
- Check if the inside of both the socket and the plug has no foreign materials inside (is clean).
- Check visually if the cable is not damaged.
- Check if the boards are not covered in dust and/or other materials.
- Check if the charging cable is connected correctly from the charger side (socket version) and from the EV side;
- Try to reconnect charging cable to the EV and EVSE (if it is socket version).
- Listen if you can hear a clicking sound from the TeltoCharge when you plug the cable to EV. Charger should lock cable plug. If you can’t hear, try to unplug cable (from EVSE side) while it is plugged from EV side. If it is possible to unplug, report this problem via VIP helpdesk or your sales manager.
- If any of these steps helps, measure the voltage between PE and PP and check if it is in accordance to the standard.
- Check the temperature inside Teltonika Energy app > Device info. If temperature is higher than 85 ℃ wait while charger cools down.
- Restart TeltoCharge
- Try reconnect charging cable from the EV side. There might be control pilot communication problem which can occur with different EV models.
- Check connected wires via TeltoCharge and energy meter inputs;
- Check if the energy meter is compatible;
- Check temperature.
How to check your charger firmware version?
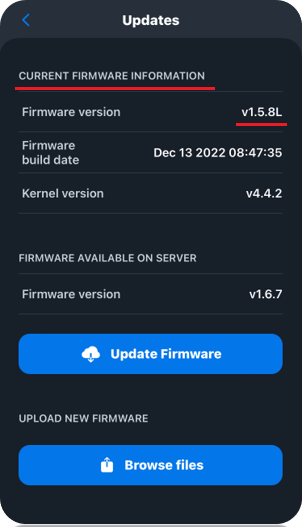
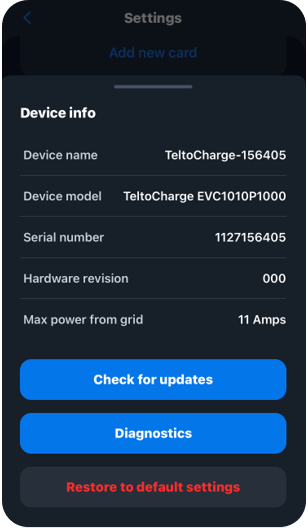
1. Go to Teltonika Energy app settings, scroll down and press 'device info;
2. Press Check for updates;
3. At the top, current firmware version can be found.
How to download troubleshoot file?
-
Simple steps of finding place in your mobile application where you can download troubleshoot file.
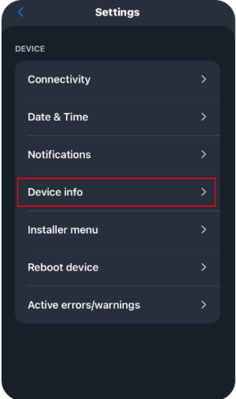
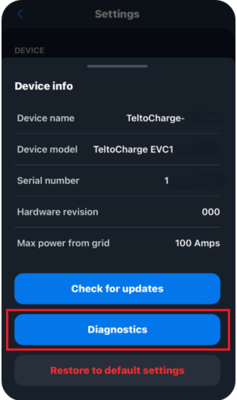
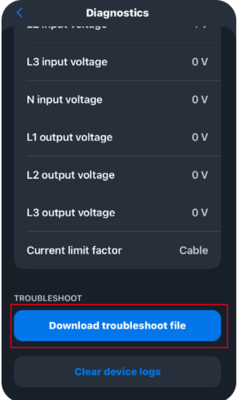
1. Go to Settings->Device info->Diagnostics.
2. Slide to the bottom.
3. Click Download troubleshoot file.
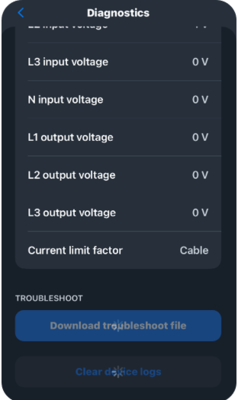
4. Wait up to 20 s for troubleshoot file to be generated.
5. Save file to your mobile phone and provide it to our Technical support departament.
LED indicators
STATUS INDICATIONS
| A | B | C | D | E | F | G | H |
|---|---|---|---|---|---|---|---|
| White LED‘s rolling from the bottom to the top – shows that TeltoCharge is booting up | White LED‘s rolling from the top to the bottom – shows that TeltoCharge is Reserved (OCPP only) | White pulsing LED‘s – shows that TeltoCharge is in standby mode and waiting for action | Yellow pulsing LED‘s – shows that TeltoCharge is in standby mode with default settings. | Yellow LED‘s on – TeltoCharge is not charging, simplified charging sequence is required. | Blue LED‘s lights up from the middle – TeltoCharge do not require permission, it is waiting for EV to initiate charging process (go to state C). | Blue LED‘s pulsing – permission to charge is not granted. TeltoCharge requires authorization. | Blue LED‘s rolldown from up to down
1. Wait for scheduled time. |
| Open installer menu via Teltonika Energy app, set and save settings. | Open installer menu via Teltonika Energy app and select to allow simplified charging sequence | Authorize yourself with app or NFC card. | 1. Go to settings via Teltonika energy APP and select schedule time section to check for set graphs 2. Wait for more available power or increase amperage limits via settings (if your grid allows it) |
| I | J | K | L | M | N | O |
|---|---|---|---|---|---|---|
| Four middle blue LED’s pulsing – TeltoCharge waiting to add new NFC card | Green LED‘s pulsing - Initialisation of charging. | Green LED‘s rolling upwards from the bottom – TeltoCharge is in charging process. | Green LED‘s on – TeltoCharge finished charging. | Purple LED‘s on – TeltoCharge requires ventilation (charging is done in state D). | Red four middle LED's - NFC/RFID card declined from the server. | Green four middle LED's - NFC/RFID card accepted from the server. |
| Open installer menu via Teltonika Energy app and select that charging location is ventilated. To select that charger must be installed in ventilated location. | Check if NFC/RFID card is in a server cards whitelist. |
RED LED INDICATIONS (errors)
| A | B | C | D | E | F | G | H |
|---|---|---|---|---|---|---|---|
| Input voltage error. | Output voltage/current error. | Current leakage detected. | Connectivity error. | Temperature error. | Internal errors. | Faulty connection to EV. | Warning orange LED |
| Overvoltage;
Undervoltage; Wrong wiring. |
Overvoltage;
Undervoltage; Output current. |
Current leakage detected | Cable lock;
PP fail; Car diode. |
Temperature reached 85°C | -12V; | CP fail |
Problems with energy meter: Other problems: |
|
|
|
|
|
|
|
|
Go to the live data section and see what is the main problem.
|
WARNINGS
| Simple CP detected | Temperature warning | Ventilation required | RTC time lost | Simplified CP denied | D state denied | Sensors not calibrated | Energy meter comm error | NFC init error | Low battery voltage | Emeter wrong type | E-meter unidetified | Main Board boot fail |
| Connected EV uses Simplified charging sequence. Charging power is limited to1 Phase 10 A; | Temperature higher than warning limit, current throttling
is present. |
EV requiring ventilation | EVSE date and time lost | Simplified CP detected and not allowed | EV requiring ventilation but charging location is not ventilated | Sensors were not calibrated during HW configuration | Energy meter communication error | NFC initialization error | Low battery voltage EVSE (RTC) | Energy meter configuration mismatch | Energy meter type unidentified | Main board is failing to boot |
|
Connected EV uses Simplified charging sequence. Charging power is limited. In installer menu option „Simplified charging sequence“ must be turned ON. |
Check if Charging location is sufficiently ventilated |
Check EVSE RTC coin battery (CR 1220) |
Connected EV uses Simplified charging sequence. Simplified CP charging is disabled in Installer menu. |
EV requiring ventilation, but Charging location is specified as not ventilated in Installer menu. |
Contact support. |
Check RS485 connection with external meter. Inspect cable. Check if meter is working. Make sure devices are configutated properly. |
Reboot charger and check if the issue remains. |
Check EVSE RTC coin battery (CR 1220). |
Connected Energy meter and configured Energy meter type in Installer menu are different. |
Unknown device detected. Check if the energy meter is compatible. |
Reboot charger and check if the issue remains - contact support. | |


